Preserved Series: Volume 2 Fruit Recipe for Fermented Apple Butter

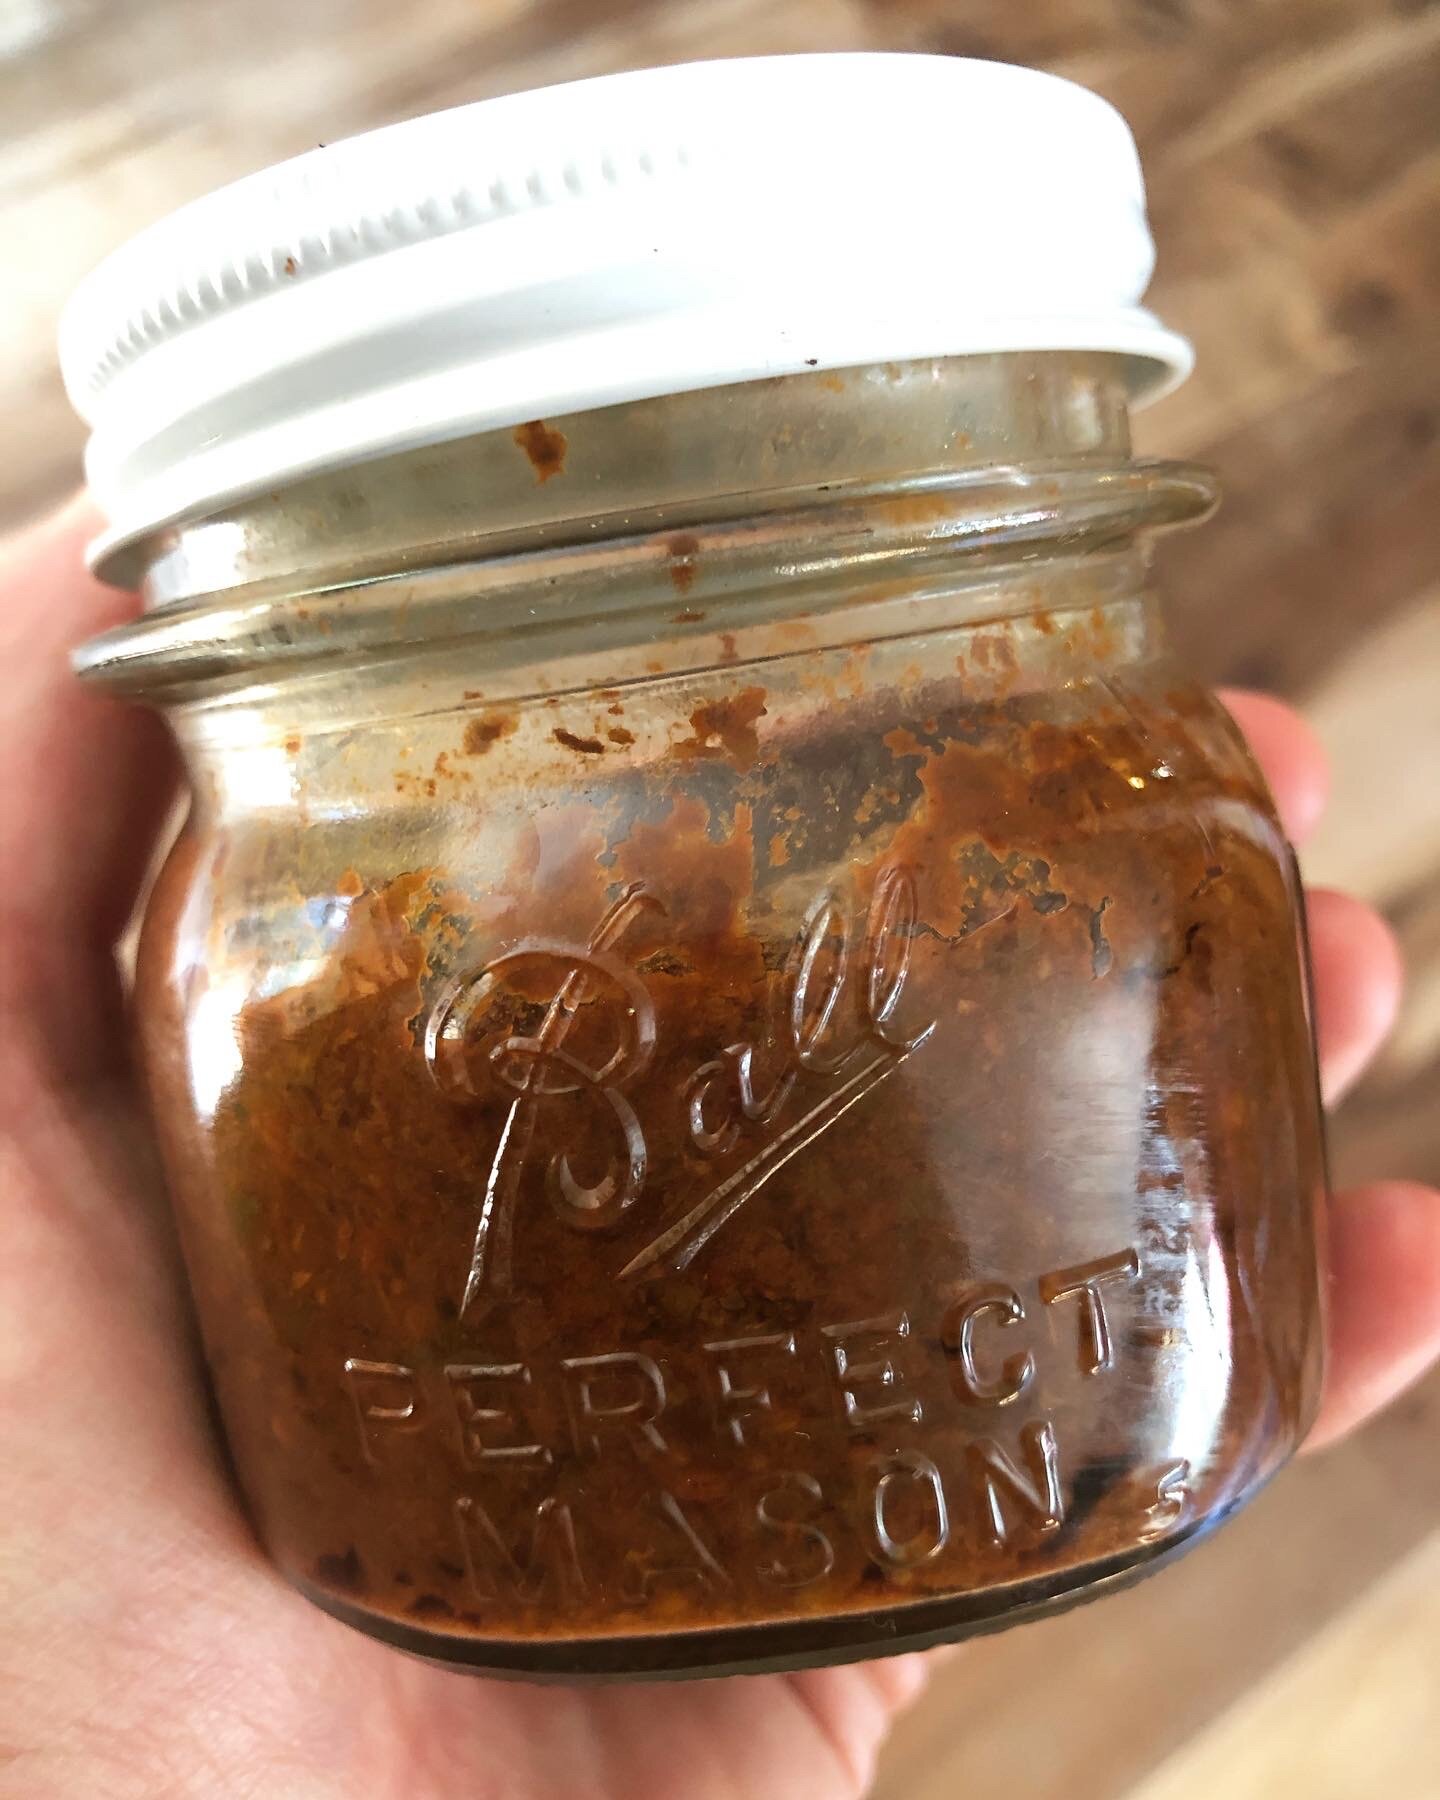
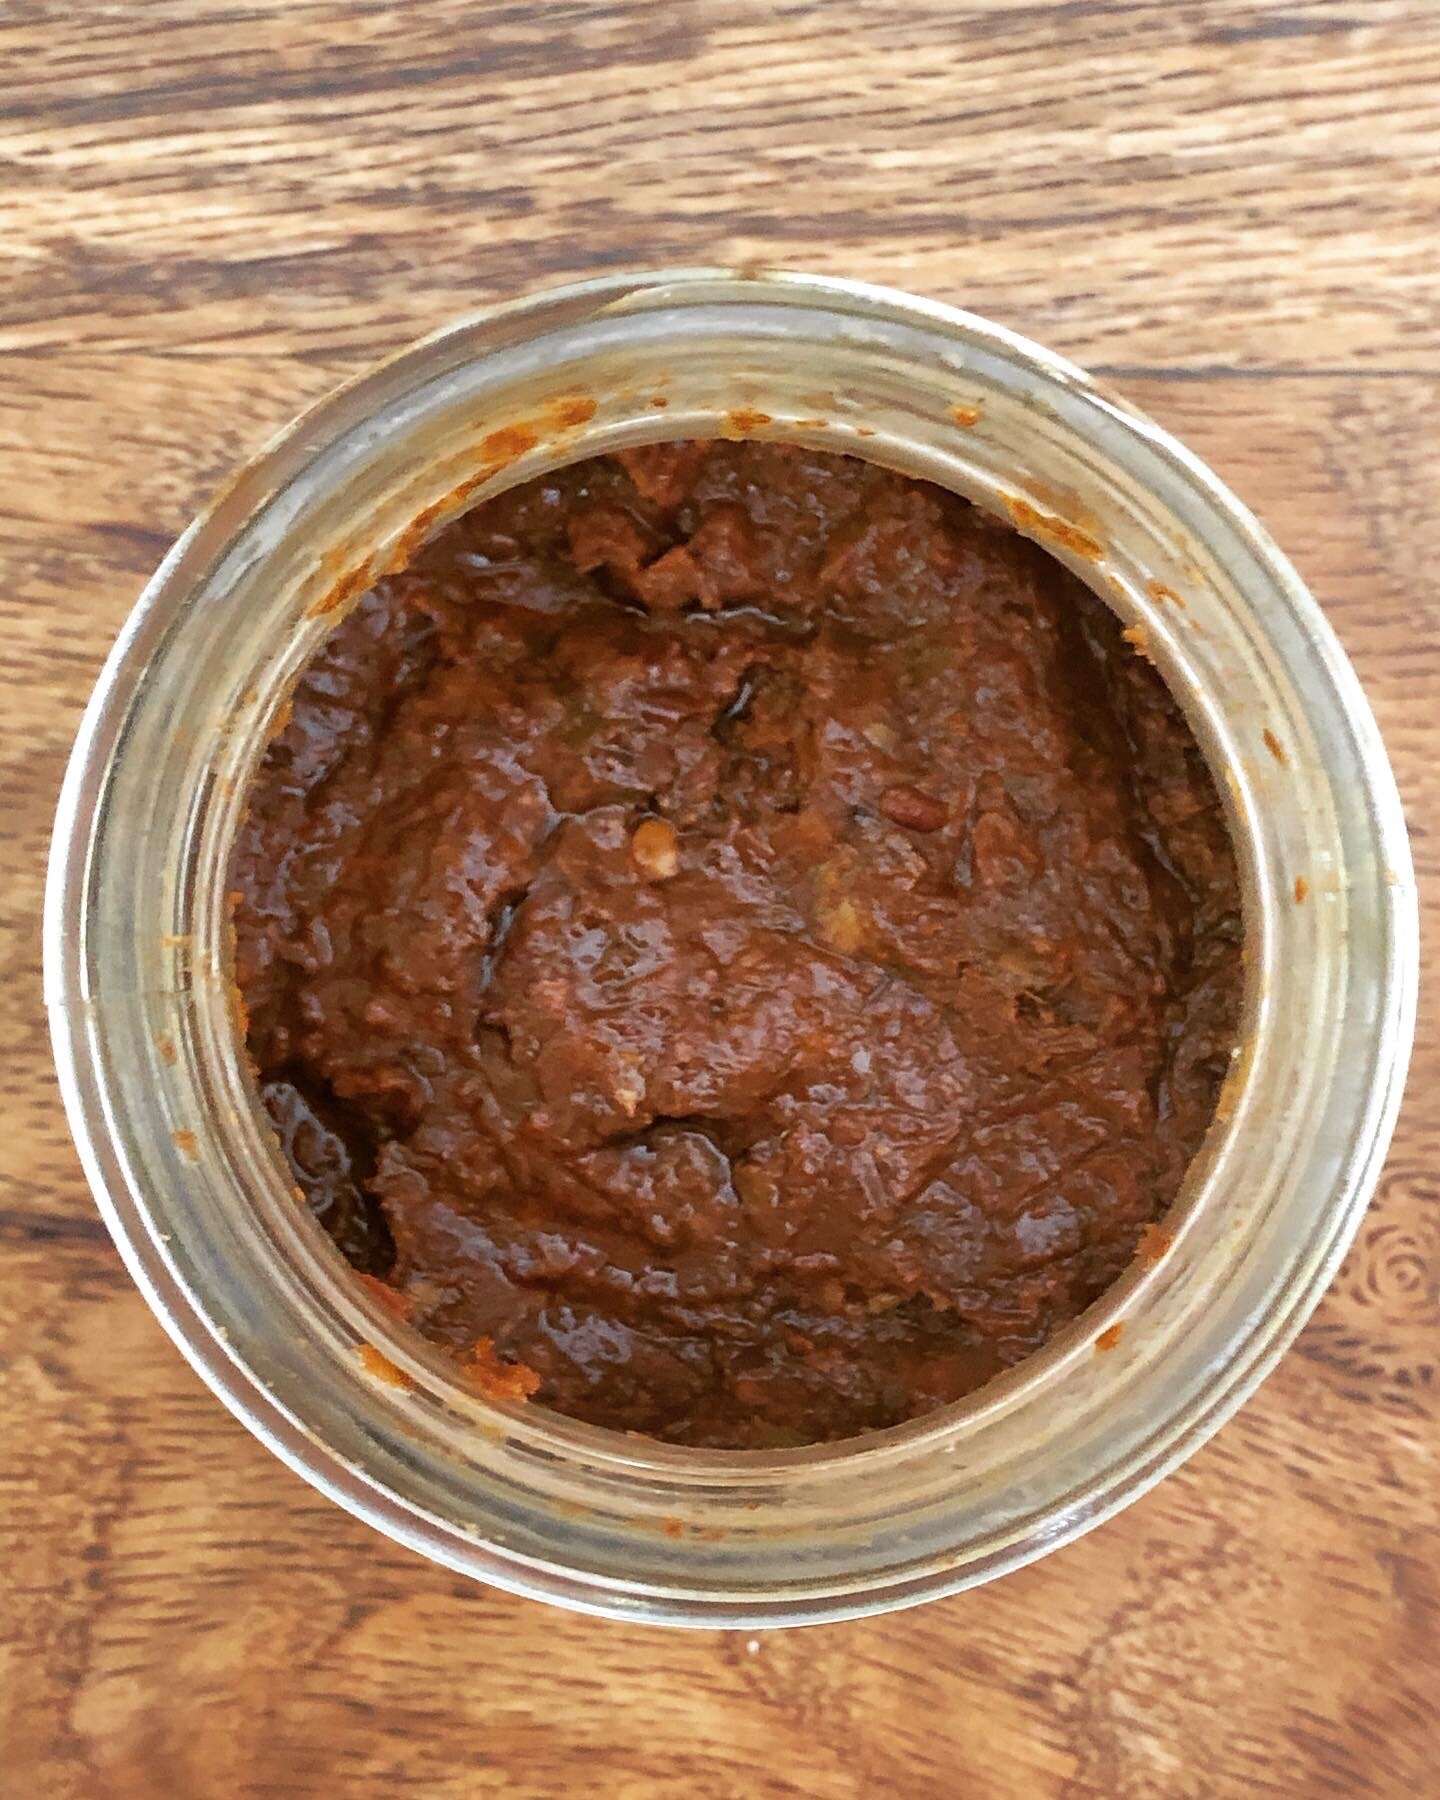
Fermented Apple Butter — intriguing isn’t it?

Before I fermented everything, I canned everything. If my memory is correct, my first foray into preservation was strawberry jam followed by apple butter that fall. I always loved apple butter and found the stuff in the store way too sweet, when I could find it.

We grew up eating a lot apple butter during the part of my childhood that we lived near the Cornell Apple Orchards in Ithaca, NY. For me apple butter is all autumn and comfort. We ate it over thickly lathered cream cheese on toast. Yet strangely it also reminds me of my grandmother who associated apple butter with the unpleasant memory time in foster care. She’d been orphaned at 11 and at one home she was fed apple butter on rye bread daily. No butter, no cream cheese.

Now I only can a few things and apple butter is one of them. Yet I have never fermented apple butter. I grow the apples, press the sweet cider, use homemade vinegar and simmer it for hours in my copper jam pot. This year my six-year-old grandson joined me and spent an hour running the steamy cooked apples through the food mill for me. He is fascinated by process and the tools needed so the food mill he had never seen before was the best way to spend the waning hours of the day—turning the crank and talking about it the whole time.

After making my apple butter for the year, I read  Preserved: Fruit and became intrigued by the recipe the authors and publisher have shared. Next time…

Preserved: Fruit is the second volume in a new series of six books that are all about preservation. The series is written by Darra Goldstein, Cortney Burns, and Richard Martin. It came out simultaneously with Preserved: Condiments volume one in the series.

I am in love with the first two books. These books share well-researched methods to preserve abundance in delightful ways. The books are a feast in more ways than one—the recipes begin with rich headnotes that give the reader historical and cultural context to the preserved food. I had the opportunity to interview the authors on my Substack Ferment Nerds. Follow this link to read the interview and for recipes for Black Salt and Fermented Honey Charoset

Volume 1 and 2 of Preserved series written by Darra Goldstein, Cortney Burns, and Richard Martin.

Sweet-Tart Apple Butter

Makes 1 Quart or 1 Liter

Excerpted with permission from Preserved: Fruit by Darra Goldstein, Cortney Burns, and Richard Martin published by Hardie Grant Publishing, October 2023

Apple butter has an intriguing history. It is thought to date back centuries to orchard rich monasteries and villages in Belgium and Germany. The practice made its way across the Atlantic with European immigrants, especially German-speaking groups who formed the Pennsylvania Dutch communities. Apple butter later spread throughout Appalachia and the American South. Families regularly turned the production of apple butter into a communal event, producing huge batches of it in large copper kettles. One of America’s most well-known brands got its start this way, when a pioneer named Jerome Monroe Smucker purchased an Ohio apple mill in 1897 and began making apple butter over a wood stove. He and his wife ladled the apple butter into crocks to extend the sale of apples year-round, and their apple butter became the foundation for what is now Smucker’s jams. While apple butter isn’t as popular today as it once was, we think that our recipe will earn a special place in your larder. Lady apples are first preserved in a brine of sugar, water, vinegar, and spices that adds a depth of flavor to the finished purée, which includes fresh apples. This smooth, tangy spread is irresistible.

Photograph credit: David Malosh


INGREDIENTS:


2 pounds / 900 g small apples, such as Lady apples

2 1/4 cups / 400 g sucanat

2 cups / 475 ml water

2 cups / 475 ml unseasoned rice vinegar

2 cups / 475 ml white wine vinegar

1 cinnamon stick

3 cloves

10 black peppercorns

1 bay leaf

1 1/2 pounds / 680 g fresh tart apples, such as Pink Lady, Honeycrisp, or Cortland Poke each small apple a few times with a skewer or push pin. Place the apples in a 3-quart /3 L crock or jar.

PREPARATION:

In a medium saucepan, bring the sucanat, water, rice vinegar, wine vinegar, cinnamon, cloves, peppercorns, and bay leaf to a boil. Pour the hot brine over the apples and cover the container. Leave them to sit for 1 month in a cool, dark place.


To make the apple butter, drain the pickled apples, reserving the brine. Cut the pickled apples into 1-inch / 2.5 cm slices and place them in a Dutch oven or other large, heavy pot.


Cut the fresh apples into 1-inch / 2.5 cm slices and add them to the pot. Pour in enough of the pickling brine to come halfway up the apples (you will use about half of the reserved brine); discard the rest of the brine.


Cover the apples and brine with a circle of parchment paper (a cartouche) and bring to a boil over medium heat. Cook at a rapid simmer, stirring frequently once the apples begin to soften. Continue cooking until the apples are falling apart and only a shallow layer of liquid remains on the bottom of the pan, about 45 minutes.


Scrape the mixture in batches into a food mill and pass it through the mill to make a very thick, smooth puree. Pack the hot apple butter into small jars, cap them tightly, and refrigerate for up to 4 months. For even longer keeping, see Notes on Canning (in the book).


SERVING SUGGESTIONS:

FILL THUMBPRINT OR OTHER COOKIES / SPREAD ON BUTTERMILK BISCUITS AND TOP WITH BACON / USE AS A FILLING IN LAYER CAKE WITH MAPLE BUTTERCREAM /ENJOY WITH CHARCUTERIE AND CHEESE

Advanced Praise for Homebrewed Vinegar: How to Ferment 60 Delicious Varieties

I am excited to share this book with you

I am excited to share this book with you

Have you ever wanted to make your own vinegar? How about making your own apple cider vinegar at home? This book will show you how to make pantry staples like apple cider vinegar, but also wine vinegar and beer vinegar. Did you know you can make vinegar with brown bananas? Corn cobs? Raspberries? You would be amazed what can be made into vinegar. We hope this book does that—amazes you!

But don’t take it from us…

“Homebrewed Vinegar is as scientifically rigorous as it is historically rich. Kirsten Shockey’s elixirs will satisfy curious chefs, home cooks, gardeners, and citizen scientists. She is the real vinegar mother, holding our hand as we discover microbial mysteries and the deliciousness of transformation.”

Dan Barber, chef at Blue Hill

“Kirsten Shockey is one of our greatest fermentation educators. Homebrewed Vinegar is as thorough, accessible, and clear as Shockey’s other wonderful books. It completely demystifies the process of making vinegar and will surely inspire many fermenting jars in your kitchen.”

Sandor Ellix Katz, author of Wild Fermentation and The Art of Fermentation

“Kirsten Shockey continues to inspire and amaze. She not only teaches us the history, science, and technique of fermented foods but also manages to make it extra-enchanting, through the bold exploration of flavors on the edge of our consciousness. This book will teach you how to make quality vinegar more thoroughly than almost any modern book on the market, but it will also fill you with creative wonder about an ingredient you may have once taken completely for granted.”

Meredith Leigh, author of The Ethical Meat Handbook and Pure Charcuterie

“To say that Homebrewed Vinegar is a fantastically researched, mind-blowingly comprehensive, and very approachable book is an understatement. Shockey does it again with this book, as she has with her previous ones, by showing you all the ins and outs of making vinegar. With her as your guide, you’ll be able to make any vinegar that your mind can dream up. She will entangle you with her love of fermentation and inspire you to share that love with others. This book holds a prominent space on my bookshelf and will do the same on yours.”

Jeremy Umansky, larder master, coauthor of Koji Alchemy, and owner of Larder Delicatessen & Bakery

“I’ve traversed the globe in search of all vinegar has to offer, and this enlightening compendium is precisely what was missing from the vinegar world. I’m so excited to see an acid aficionado like Kirsten Shockey show us that there’s no limit to what vinegar has to offer. She makes acidity accessible to all, at home and abroad.”

Michael Harlan Turkell, award-winning food photographer, author of ACID TRIP: Travels in the World of Vinegar, and host of Heritage Radio Network’s The Food Seen and Food52’s Burnt Toast podcasts

“I really like Kirsten Shockey’s latest book on brewing vinegar at home—a lot. It’s thorough and considerate and she tells you exactly how to proceed. There’s no reason to think that I—or you—can’t make vinegar too.”

Deborah Madison, author of In My Kitchen and An Onion in My Pocket

“Kirsten Shockey continues her work of helping us understand and harness the power of fermentation, with an eye and a palate toward expanding our tastes and methods. This new book goes into the canon immediately.”

Harry Rosenblum, author of Vinegar Revival and cofounder of The Brooklyn Kitchen

“This comprehensive, well-researched collection of recipes and methods reveals the history, versatility, and flavor complexities of this ancient ferment. Whether you’re looking for ways to avoid kitchen waste, convert various alcohols to acids, or maximize seasonal abundance, this book is an approachable guide to the science and magical alchemy of vinegar making. Kirsten Shockey transforms a wide range ofingredients into a unique reflection of time and terroir using fruits and ciders, seasonally playful flower blossoms, and even jewel-hued purple sweet potatoes. This book will keep your pantry flush with vibrant options for flavor, nourishment, and culinary creativity.”

Sarah Owens, author of Sourdough

I would be honored if you ordered this book from you favorite local independent book seller. It can also be found online or if you want a personalized copy that is signed from me. Finally, through May 11, as a preorder bonus I offering a chance to win a one-on-one Zoom lesson with me (we can talk vinegar or any ferment you would like) and five winners will get the How to Make Vinegar at Home online class that I teach at The Fermentation School where you will find a great collection of fermenting classes. If you want to read more about how vinegar is good for you head to this article.

Is Apple Cider Good For You?

First off, we should get straight on what we mean by apple cider because that term means different things to different people, depending upon where you live in the world.

For most of the world fresh apple cider or apple cider juice means the juice of the apple, although apple juice can be extracted in a number of ways where as cider is usually reserved for grinding it up and pressing this mash under pressure to capture the fresh juice.

What we are talking about in this post is the fermented version of that, and be honest, wouldn’t you expect us to be talking about the fermented version? We consistently make over 80 gallons of cider on the farm every year. That might seem, excessive to some, but we have a lot of friends that include a trip through the cider cave as a critical part of the visit. Also, we are now turning a lot, maybe even the majority, of this cider into another product, vinegar! You can also read about how vinegar is good for you here.

Our cider cave at its prime before photo shoot for The Big Book of Cidermaking

Our cider cave at its prime before photo shoot for The Big Book of Cidermaking

Most of us have heard the stories about our colonial forefathers in America who regularly drank local hard cider because it was safe to drink, unlike the water. Thankfully most of us have access to clean water these days, but we have plenty of other risks to our health that cider can address in a small way. As we talked to cidermakers from around the world, we kept hearing the same thing:

Real cider is food.

The vitamins in the fruits used to make cider don’t degrade in the fermentation, and in some cases are enhanced by fermentation. So we get the benefits of the apple’s high antioxidants and polyphenols, both of which can help prevent several non-communicable diseases like diabetes and cardiovascular disease. Homemade ciders, especially those that are wild-fermented, often have lower alcohol levels.

Phytochemicals. These are a group of chemicals found in plants that benefit our health, such as carotenoids, flavonoids, isoflavonoids, and phenolic acid. One of the most important benefits of phytochemicals for us are their anti-oxidative characteristics.

Probiotics. A single apple has over 100,000 different microbes 90% of those are in the core of the apple which usually goes uneaten but is definitely part of the cider. Included in these microorganisms are lactic acid bacteria which are present from apple to finished cider — as long as they aren’t killed by the cidermaker. (If you want a probiotic cider, you can’t apply sulfur dioxide (SO2) and you can’t pasteurize your finished cider, which is probably why it’s so rare to see a cider advertising its probiotic content.) When you make your own cider, you can control all these aspects and can produce a probiotic-rich cider.

Taking it to the next fermentation level

You can make a great tasting, healthy fermented cider beverage for very little to no money. The next natural stop for that fermented cider is to continue its fermentation by passing off the baton to acetic acid producing bacteria, which consume the alcohol produced by the yeasts and turn that into acetic acid, the sour punch of vinegar.

Its actually pretty beautiful isn’t it? If you enjoy imbibing now and then you can create a fermented cider at the alcohol level you want, with or without carbonation, with or without sweetness. Don’t like the alcohol, no problem, just open that wonderful cider up to the air and acetobactors and you will soon have some very tasty and healthy homemade vinegar.

Learn how to make your own cider you can pick up a copy of our cidermaking book The Big Book of Cidermaking from ANYWHERE you buy books. Or, signed directly from us. If you want to take it to its natural fermented finale, order a copy of Kirsten’s upcoming Homebrewed Vinegar: How to Ferment 60 Delicious Varieties or order a copy from us and have it signed!

If you prefer learning by watching and making along we have just released a complete class on how to make vinegar, that includes extensive lessons on how to make apple cider vinegar.

Make Garum Like a Roman :: Garum Recipe

A well preserved garum shop in Pompeii has given researchers not only more clues to the production of garum but another bit of evidence to back up an August eruption date of Mount Vesuvius. Alfredo Carannante analyze.jpg

Here is a Garum recipe that is an extension of our previous post about Roman garum making in Barcino (modern Barcelona) ancient times. At its most basic garum (also sometimes called liquamen) is seafood, salt, and time. Roman makers though, we imagine, were looking for competitive edge and some shoppers for unique flavors. Of course, the choice of sea foods was paramount in flavor and likely ultimate price. We’ve read in numerous places mackerel made a good common garum, including Pliny. The best according to a 10th century book of agriculture the Geoponica was made with tuna innards, blood and gills (full utilization in action). However, the maker might include wine and herbs. One ancient recipe translation we read called for highly aromatic dried herbs that line the base of the fermentation vessel, then as fish and salt are layered so are more herbs.  The Barcino “factory” was right next door to a winery so I can see a partnership with less than ideal wines going into the garum.

The following recipe is a traditional fish based garum if you are interested in a modern spin on this umami sauce you can learn to make a bone marrow garum here.

In our research recipes layered salt on the fish. The same Geoponica recipe is roughly 12.5% ratio (8 parts fish to 1 part salt) but we found the flavor crisper and cleaner at a 18% salt by weight of fish ratio. Ancient recipes used significantly more salt than most people do today. Remember, salt was the preserving mechanism and the fermentation control, and it wasn’t something people couldn’t get away from because it was hidden in processed foods. Garums and other preserved nutritionally dense foods where the processed foods and the way the fresh foods were salted.

Heat is also a consideration. The ancient recipes all call for some sunshine and our modern sensibilities know that enzyme action is faster and most efficient around 138°F/59°C. These are the temperatures we use to speed up koji-based ferments. Temperatures in different regions might also contribute to the varying times prescribed—from 20 days to 6 months.


2 pounds (900 grams) raw mackerel, or other raw fatty fish (sardines are another good choice)

5.7 ounces (162 grams) salt

Optional dried herbs


1.     Chop the whole fish up, blood and guts and all.

2.     Mix thoroughly with the salt and optional herbs. Everything should be coated.

3.     Place mixture in a fermentation vessel. If you have an amphora go for it, otherwise use a half-gallon or gallon glass jar. Lid finger tight.

4.     Keep in sun, or warm, if possible. Warmth will move things along.

5.     Stir daily for the first two weeks. The more you stir the better. If you want to increase the surface area which will help with the enzymatic break down, you can mix it with a hand blender if you want to.

6.     Allow to ferment for about 4 months at room temperatures, stirring occasionally. It will go faster if you keep it warmer than that. The mixture will completely dissolve over time, if you don’t blend it you will still see the bones.

7.     It will separate and the liquid will be a variation of a clear amber color.

8.     Strain off the liquid. Use a coarse strainer first and then a fine strainer and finally a sanitized dense cheese cloth.

9.     Bottle the liquid. It will last indefinitely. 

What is Garum? Discovering Ancient Roman Fermentation beneath the streets of Barcelona

If you don’t recognize the name Garum you might have tasted, or at least smelled, fish sauce from southeast Asia. Other names for garum fish sauces are liquamen, allec, or muria, but we suspect it is less likely you have come across those names. Two thousand years ago garum was very popular in the Roman Empire, having probably been introduced to the Roman palate after they conquered Carthage, across the Balearic Sea in what is now Tunisia. The fermented fish sauce garum was a staple for all levels of roman citizenry. Besides its concentrated umami punch it’s also an amazing way to preserve an ocean’s perishable abundance for a long period of time. The secret to its longevity is in the process, which you might find fascinating, impossible or just a little gross. More on that in a moment.

In 2019 we were invited to Spain to teach different fermentation techniques, including making miso, hard cider and fermented condiments. So, on our last day in Barcelona we decided to get away from fermentation for a few hours and walk across the city to the Gothic Quarter to find the Picasso Museum. Walking through the tight cobblestoned streets of this old part of Barcelona you can easily imagine a scene from the middle ages, or for Christopher something from Monty Python’s Holy Grail. It feels old, worn yet solid as the giant blocks of stone that make up many of the walls. Upon finding the museum we realized a lot of people had already had the same idea and it would be many hours before the next tickets were available. So we did what we usually do in new places and wandered around. That’s when we found something amazing completely by accident.

 Just a few minutes’ walk down a couple of narrow streets we randomly walked into the yawning vastness of the Placa del Rei, a square surrounded by the Palau Reial Major or Grand Royal Palace. It was sunny and the square and massive spreading steps to one end were covered with couples and families taking in the sun’s rays or enjoying a small bite to eat. Kirsten noticed the simple sign and being the more adventurous one convinced Christopher his stomach could wait until they checked out this Museum of the History of Barcelona. We checked in our backpacks into lockers, grabbed English versions of the handheld audio tour wands and were escorted into an open elevator. Two floors down we stepped out into an underground Barcelona of 2000 years ago, the roman fortification of Barcino. Painstakingly excavated for more than 30 years below the palace above and featuring among other things the remains of a very old fermentation business it takes a few minutes for you to take in what your eyes are seeing. Elevated walkways above the ruins allow for you to basically hover a few feet above over 43,000 square feet of ruins, including a winery and a factory that produced a fermented fish sauce called Garum. (See the artist rendering in the slide show.)

Alright, remember the process, which you might find fascinating, impossible or a little gross? We are in the find-it-fascinating camp, but you be the judge. If you find yourself in the fascinating camp check out this recipe. To understand what is happening in garum fermentation you need a quick anatomy primer. Organisms have in their guts microbes that break down the foods ingested to supply themselves and their host with energy. This happens in halibut as well as in a human. These microbes stay within our guts, keeping their activity focused on what we eat and not on ourselves and the same goes for the fish these early Spanish fisherman were catching. However, if you chop the fish up and throw everything in a big vat with layers of salt, these microbes break down the proteins and fats of the fish, sea urchins and whatever ends up down in there to liquidy amino acids, fatty acids and the bones. It’s the animals’ own digestive juices turned upon themselves. Perhaps a cautionary tale to remember to feed your gut microbes within you well, otherwise, well…

The initial salted stage set up the fermentation was in large vats cut out of the limestone and sheltered from the rain and sun by awnings of sorts. (See the rectangular stone tubs in the slide show.) After some time through a series of connected troughs and drains the fermented fish mash was transferred to smaller containers that would have been outside on the patio to further condense in the sun. Beside these were the well-preserved remains of mortars that were used when the finished garum was transferred to massive clay pots, called dolia, on raised platforms for storage and sale. (In the slide show these are the two views of huge round pots.) Remember the bones? Those were fished out (sorry for the pun) and ground up in the mortars to make fertilizer or as an amendment to animal feed. An intricate series of stone gutters carried whatever was left off after washing between batches, likely flowing into the local waterways to become nutrients. A true zero waste fermentation operation and likely ran for hundreds of years judging by the layers of flooring tiles that reflect many renovations of the factory.

Now that you know more if you are thinking you are leaning toward the gross camp don’t beat yourself up about it. People have had strong opinions about garum for at least the last 2,000 years. Pliny the Elder, a fellow author described it as “that secretion of putrefying matter” while his contemporary Seneca piled on the garum hate train to ask “Do you not realize that garum sociorum, that expensive bloody mass of decaying fish, consumes the stomach with its salted putrefaction?”  Not exactly inviting is it? One of the biggest challenges for some isn’t so much how it’s made but the smell. Make it outside in a shed, on a balcony, or any place that your loved ones (and neighbors) won’t be offended. Also, if you are making a traditional garum with all the animal including the head and organs make sure its fresh. Believe it or not starting out with fish that doesn’t already smell fishy is helpful. This is not a place to decide to use the fish too far gone to eat otherwise. If you know that you want to make an amino sauce, or modern garum you can replace the fish gut microbes and enzymes altogether by bringing in a new team.  Sweet floral smelling Koji, aspergillus oryzae, which you can read about all about in our book Miso, Tempeh, Natto and other Tasty Ferments can offer its enzyme superpowers to break down proteins in similar ways. For these modern garums koji is used with a concentrated salt brine and protein.

If you want to explore the world of modern garum you can get started here with this class to make Bone Marrow Garum taught by Meredith Leigh. To read more about fish sauce head to this article.

Aged Fermented Thai Red Curry Paste

How to know when old ferments are still good? That is a question many of ask when we find a jar we didn’t remember we had. Lost and found ferments are real. We all have ferments that slip quietly to the back of the fridge where they get forgotten. In the spirit of full utilization and not wasting food I want to help you figure out what is still good (and maybe even tastier!) and what should be thrown out.

How a ferment ages depends very much on what kind it is. The original ingredients will determine a lot about its longevity. Miso and other bean ferments generally keep aging and layering on flavor. These may have a layer of mold growing on them but underneath they are still safe. Vegetables are quite variable in that they can still be technically “good” but no longer vibrant. I find a sauerkraut that is over a year old is generally of this ilk. Whereas a chile pepper based ferment has compounds in it that give it years of delicious longevity. Check the last post about creating hot sauce from old fermented pepper pastes. I also find herbal ferments like basil or shiso have a much longer lifespan do to the constituents that make these herbs antimicrobial. To learn more about fermentation methods head to Fermentation School.

This fermented Thai Red Curry Paste is an example of a ferment that had both antimicrobial preservation ingredients and chiles. I found it recently in the recesses of the fridge. It was made in 2015. To be fair, not the daily fridge, one of the ferment fridges where things get “lost and found” often. This recipe is from Fiery Ferments and took inspiration from one of our favorite flavors and lacto-fermented it. Early in the ferment it doesn’t taste as good, it gets better with age.As the fermentation continued, the flavors blended and created a pleasing complex red curry flavor. So hence making it and putting it away for 6 months, um or 5 years. What do you do? Make curry. Below is the recipe for your enjoyment, go ahead hide it in the back of the fridge after it has fermented to discover later.

To evaluate your old ferment for “good” you will use your senses and trust your gut. Properly fermented the pH will have been below 4.0 this ensures that harmful bacteria will not live in the ferment. (You can test with a pH meter or test strips.) You will also know because it will be pleasingly acid — think pickles. If the ferment is still anaerobic (under the brine and no airpockets) then it is also a good sign. There may be yeast, even mold on top but that can be removed. As long as it is just on top and the rest is anaerobic it is fine. Then of course there is smell, does it still smell fine—not foul, putrid, musty or off? If so you can move to a small taste, this will give you a lot of information. It should taste fine. If it does not, then it is not.

RECIPE FOR FERMENTED THAI RED CURRY PASTE

Thai pastes are traditionally ground together with a mortar and pestle. We mention this because there is a texture difference: the fibers of lemongrass and roots don’t break down as much in a food processor, though the flavor will still be delicious.

3 tablespoons fresh lemongrass, chopped

1 medium shallot, or 4 tablespoons, chopped

9–10 diced Thai type small red chiles, deseeded, soaked, and drained

1/3 cup loosely packed cilantro, chopped, with root when possible

8 medium cloves garlic

2 tablespoons galangal, grated

1–2 kaffir limes (also called makrut limes,substitute regular limes if unavailable)

1/2 tablespoon kaffir lime zest (take care not to zest the bitter pith)

2 teaspoons kaffir lime juice

1 1/2 teaspoons salt

1. Process all the ingredients to a paste consistency in a food processor. Sprinkle in the salt. It will become juicy immediately.

2. Pack the paste into a jar that is just the right size for your ferment, leaving at least an inch of headspace, release any air pockets as you press it in. The thick brine will be hard to distinguish from the rest of the paste.

3. Press a piece of parchment paper (or other cartouche) against the surface, being careful not to trap any air beneath it. Screw the lid down tightly.

4. Put the ferment in a corner of the kitchen to cure, and watch for air pockets forming in the paste. If you see them, open the lid and press the paste back down. If the lid starts to bulge, simply open it for a moment to “burp” the ferment.

Hot Sauce from aged fermented peppers

These aged fermented hot sauces are an example of the versatility of fermentation-preserved foods. They are also an example of zero-waste, or whole utilization, at work. If we are being perfectly honest, they are the result of years of procrastination. These little bottles are packed with flavor and feel in many ways like a time-capsule of gardens past.

Healing with Fermentation

Learn to ferment online.jpg

Microbes are everywhere and key to nearly every natural process. They were on the Earth first, long before our farthest common ancestors existed, and they will likely be here long after we have died out or left the planet for a new, less polluted home. You are reading and I am writing because our ancestors noticed something pretty special. They noticed that fruit turned to alcohol and then vinegar, vegetables got sour, milk curdled. It just happened and these ancients learned to duplicate this by creating the environment where the magic could happen again and again. Thus, they preserved their food, making it last through the lean times while also making it safer and more nutrient dense.

Here is the thing. These live foods should have nothing to do with privilege or circumstance. The microbes are non-judgmental, they are everywhere and don’t cost a damn thing. They don’t require special equipment just a little bit of knowledge and care to their needs. The cheapest commodity vegetables under the work of the microbes becomes incredibly rich, delicious and healthy. And yet, fermented foods have fallen int the category of elitist foods. How is that?

This has been on my mind for years. I have sought opportunities to teach this once common practice to the underserved communities that need it most. Often it has been public libraries that have been the portal to homeless folks in cities (it’s true you can ferment in an old jar without access to a kitchen or refrigeration), or impoverished rural communities. The people at these programs soak in the information and are truly grateful. It is in these moments that I feel the most like I am doing a little something to make the world a better place. Yet, it has never felt like enough.

Here we are now, 2020, unable to gather, more and more folks powerless to fulfill their basic needs or live freely on truly equal footing no matter their race, ethnicity, homeland, religion, gender or sexual orientation. We are all on an ailing planet with systemic poor health and suffering among its inhabitants. We have newly displaced folks from fires added to an already difficult system.

Fermentation is simple yet powerful. Powerful in its ability to heal. Powerful to help individuals take a small amount of control of their food. It’s a bold first step. What other process takes the most inexpensive vegetables and allows a body to make their own probiotics, vitamins and digestive enzymes (that happen to taste great)?

We never want money to be the reason why someone can’t get access to our content. We’re keeping our basic fermentation course inexpensive during these troubled times because we don't want anyone to not be able to access. If you cannot afford it please email us. All the proceeds from this class will be part of local efforts to help displaced folks in the fires that are sweeping through our community. We are working to coordinate food businesses, farms, and aid resource organizations to set up a meal preparation and delivery program. Meals, prepared in local restaurants with local ingredients, will be delivered to locations where evacuees and impacted families are sheltering. Breakfast. Lunch. Dinner. We are starting soon and will keep this program running for a minimum of six months.

This is for the two the communities we have ties to that are gone, reduced to ashes, like so many others. These communities housed many low income farm and service community workers. The official FEMA numbers ignore these mobile home communities which make the majority of the aerial scenes you have all likely seen this week. Only the waffle patterns of the metal frames give any hint of the homes there stood there earlier that day.
Participating restaurants, farms, and food processors will represent the diversity of our valley, with a focus on female and BIPOC owned businesses. Program investment capital will keep communities intact. Restaurant workers will be working and farmers will be farming, while evacuees are supported nutritionally and emotionally through the care taking of hospitality professionals.

Thank you—let’s heal together, one gut at a time.

An Apple a Day...The Big Book of Cidermaking

Cider-Poster-VF-Newsletter.jpg

In The BIg Book of Cidermaking we explore the idea that cider, or hard cider, is healthy. The idea for this poster came about when we were brainstorming how to help cider become the next sourdough. It is after all, another way to watch the magic of microbes transform simple ingredients into delicious foods or drinks—at home! Let us know if you think cider is the new sourdough?

Is Cider Healthy?

Most of us have heard the stories about people in the past that regularly drank local hard cider because it was safe to drink, unlike the water. Thankfully most of us have access to clean water these days, but we have plenty of other risks to our health that cider can address in a small way. As we talked to cidermakers from around the world, we kept hearing the same thing: “real cider is food.” 

The vitamins in the fruits used to make cider don’t degrade in the fermentation, and in some cases are enhanced by fermentation. So we get the benefits of the apple’s high antioxidants and polyphenols, both of which can help prevent several non-communicable diseases like diabetes and cardiovascular disease. Homemade ciders, especially those that are wild-fermented, often have lower alcohol levels. 

Phytochemicals. These are a group of chemicals found in plants that benefit our health, such as carotenoids, flavonoids, isoflavonoids, and phenolic acid. One of the most important benefits of phytochemicals for us are their antioxidative characteristics. 

Probiotics. A single apple has over 100,000 different microbes 90% of those are in the core of the apple which usually goes uneaten but is definitely part of the cider. Included in these microorganisms are lactic acid bacteria which are present from apple to finished cider — as long as they aren’t killed by the cidermaker. (If you want a probiotic cider, you can’t apply sulfur dioxide (SO2) and you can’t pasteurize your finished cider, which is probably why it’s so rare to see a cider advertising its probiotic content.) When you make your own cider, you can control all these aspects and can produce a probiotic-rich cider. 

Learn how to make your own preorder your cidermaking book from ANYWHERE you buy books.  Time is running out to win. Your order will enter you in a drawing for a cidermaking starter kit (US only).

Cider Chat on The Big Book of Cidermaking

The Big Book of Cidermaking was released on September 1, 2020. We had a great in-person tour planned for the release of this book, which was originally going to launch on June 9, 2020, we’d hoped that by fall we could still go out and talk cider throughout the nation. As you know by now, that was serious wishful thinking. Like all authors with new books in 2020 we didn’t tour, we didn’t read in bookstores nor meet any of you and sign your copies. We stayed home and stayed safe.

And we did lots of interviews over Zoom, like all the other authors. In the beginning book store employees seemed excited about the new format and the ability to reach so many more people (anyone in the world with a connection) not just their regulars that came in the doors. Here is our first conversation with Ria Windcaller on her podcast Cider Chat. It was a great start because Ria is well known and well respected in the cider community, and she was a pleasure to talk with.

In the chat you will learn more about our farm, our apple orchard, our cider cave, and our decades-long fall tradition of making apple cider by hand, cranking and squeezing baskets upon baskets of our apples in our wooden and steel double-barreled cider press. It defines autumn for us. If you would like a signed copy just order one or two and we will get it out to you today.

We will be adding a cidermaking course on the fermentation school this summer so sign-up to the school for free so that you will get the notification when it releases.

Listen also at iTunes, Google Play, Stitcher (for Android), iHeartRadio , Spotify and wherever you love to listen to podcasts.

BigBookCidermakingCoversmall.jpg

Where do I find Tempeh Starter Culture?

The hardest part about making tempeh can be sourcing tempeh starter culture.

Tempeh is based on the fungus Rhizopus oligosporus (or Rhizopus Oryzae or a mix of the two). The spores of this fungus is starter that is needed. As tempeh gains world interest simply sourcing the Rhizopus to get started can be the barrier. This difficulty has increased with pandemic shipping. While the starter can be made from scratch, given the right conditions and the right hibiscus leaves it really isn't beginner project, and especially if you don't know what you are aiming for.  For safety reasons, as in purity and getting the right strains it is always better to use professionally produced starters which are grown in sterile conditions. These starters are are also free of tag-along microbes that might make you sick.

However, once you have a quality starter, with care, it can be propagated and kept going--like yogurt--for a few batches, at which point it becomes weaker and diluted. I prefer to use fresh starter for every batch but understand that isn't always feasible.

The original idea for this list is that it is a living document where sources for tempeh starter producers, or importers, are added as they are shared with us. In this way, we hope that quality tempeh spores can be sourced in any country. As does when things are crowd sourced the idea grew. We started to get information on small artisan tempeh makers from all corners of the world. We are building a second list so that they can also be found and connect with eachother.

The list has now grown into one that can connect makers throughout the world -- both commercial makers that you can buy tempeh from and home makers that you can connect with to share ideas, recipes, and local sourcing for starter or substrate materials.

If you know someone please share how they can be reached best. To share head to the course discussion, email Christopher@ferment.works, or DM @kirstenkshockey on IG. Also if you know what countries that a source sends to or doesn't please let us know.

 Tembeh binds beans and we want to take that further with  "tempeh binds community."

Because this is a live document -- from feedback so far we are adding a second section for finding raw tempeh makers.

TEMPEH BINDING THE WORLD SOURCING GUIDE

STARER CULTURE PROVIDERS These providers are either importing quality starters or have a lab to make their own.

INDONESIA

THE TEMPEH STARTER STORE 

notes: We have received a number of cultures from them and they are responsive to work with

RAPRIMA.COM

notes: Starter developed as a project at the LIPI institute in Bandung/Java/Indonesia in response to a need for a reliable, successful tempeh starter. The formula and rights were bought from LIPI and are the basis for the production of Raprima tempeh starter. Doesn’t sell small packets. Contact Amita Buissink < mrtempeh@gmail.com > who is happy to talk to people who want to take on distribution in other countries.

TEMPEH BUMBUNG

notes: Javanese company since 1960

AUSTRALIA

MARGARET RIVER TEMPEH SHOP

notes: Starter produced in Indonesia, they sell starter and tempeh kits as well

BRAZIL

ERIC PRATT  (email: enpratt@gmail.com)

notes: Produces and sell tempeh starter in Sao Paulo, Brazil, he will ship all over Brazil. Email, or contact on Facebook Tempehtastico, or WhatApp 55-11-96402-8575

MEXICO

TEMPEHSTARTERMEXICO

notes: Eugenio Molina N., Tempeh Starter México, now distributing Tempeh Starter for Mexico and South America

+52 1 9611483044

UNITED KINGDOM

TEMPEHTATION

notes: This Scottland made starter is lab tested.

USA

THE TEMPEH LAB 

notes: Tennessee family run company has its roots in the first wave of tempeh in the US. You can order small or bulk amounts. 

CULTURES FOR HEALTH 

notes: Small kit amounts online.

ORGANIC CULTURES

notes: some folks have mentioned having trouble with getting orders, you might check in with them if ordering

EUROPEAN UNION

FERMENTATION CULTURE. EU 

notes: This is a great resource for many koji and other cultures in Europe. 

TOP CULTURES 

notes: This small company, based in Belgium, like The Tempeh Lab got its start in the 70s when soy was the hope for the planet and food security.

STARTERCULTURES.EU /.NL

notes: A wonderful selection of all manner of cultures, not tempeh specific, but does carry it.
MAKROBIOTIC VERSAND

notes: German site that sells many Japanese foods, starters and health products.

ONLINE (unsure of place based)

TEMPEH.INFO

notes: Not sure where this company is located but they distribute spores from Top Cultures. We have been told that they ship to Chile, but right now the website is showing restricted shipping.

TEMPEH STARTER SHOP

notes: Various packet sizes and a rare find — dehulled soy beans. The site also reads in Spanish.

DESHIMA.EU

notes: Looks like a Dutch based health food company with many Asian options including starters.

Is Fermentation Scary?

No, but making videos about it can feel uncomfortable…

Do you want to learn to lacto ferment vegetables? Do you want to make pickles? Learn to make your own kimchi? Maybe you wonder: Is fermentation hard? Is lacto fermentation dangerous? It isn’t at all, in fact it is one of the safest preservation methods of all. If this is something you have been reluctant to try maybe now is the time to push past your comfort zone and learn to ferment at home.

Like most of us on this planet right now I am also getting the opportunity to leave my comfort zone to keep doing what I do. Teach fermentation! Christopher and I are both learning a lot of new skills in order to pivot. As someone who has made an income teaching humans together in both big and small settings my work is on hold until we can all get back together. Yet we both feel fermentation skills are more important today than ever. Fermentation is a lot of fun, but I think that it is also more than a hobby. It is a chance to interact with our food, preserve and enliven our foods with more nutrients which are more available to our systems. Fermentation is all about healthy food that our bodies evolved with and crave. Its about food security in unsure times and a strong microbiome (read strong immune system).

All that to say we are slowly working on bringing fermentation masterclasses to you from our home. I don’t think I am alone in thinking video work is hard. It is hard not to have a live audience and all the energy. Here is an outtake of our first course that proves we are either having too much fun, or I have indeed lost it.

This outtake is from our first online fermentation course ever—Flower Power. This class is about capturing and using wild yeast to ferment fruit juices into wild wines.

Homemade Fermented Oat Milk Recipe

This fermented oatmeal milk recipe uses the magic of koji to break down the rolled oats into a creamy milk that is good for you too. Non-dairy milks are great for folks who are lactose intolerant. If you are choosing non-dairy milks for environmental reasons oat milk has one of the lightest footprints.

Making your own saves money, leaves you in charge of the ingredients, and helps keep single use packaging out of the system.

Homemade oat milk recipes rely on raw oats, which aren’t the best for our digestion. The advantage of using koji rice is that the enzymes in the koji rice breaks down the larger molecules of the oats. This leaves them more digestible with more of the nutrients available for our bodies to absorb, and tastier. The other advantage is that you won’t get slimy or goopey milk which can be a problem people experience with over soaking, over blending, or using warm water.

Let’s backtrack a moment for those of you asking, “What is koji?” let me define it. Koji is the Japanese name for Aspergillus Oryzae. Koji is a fungus, more specifically a filamentous fungus that grows on the surface of its host – often rice – releasing powerful enzymes to break down complex molecules. In food this means it will break down large starches into simple sugars, proteins into amino acids, and fats into fatty acids. These smaller parts are all more flavorful.

Using koji is harnessing enzyme magic!

Koji has been used for thousands of years, think of it as a domesticated mold. It gives us things like miso, sake, soy sauce and oh so much more. You can order rice koji online, or find at your favorite Asian market.

To read more about koji or learn how to make it yourself check out our book Miso, Tempeh, Natto and Other Tasty Ferments. We also have started teaching fermentation master classes online with our friends. Check out our ever growing list of fermentation classes.

Fermented Oat Milk Recipe

You will need a jar, a blender, a nutmilk or other fine mesh bag or cloth for straining, and a way to keep your jar warm for 6 – 8 hours, and the following ingredients.

1 cup (90 g) rolled oats

½ cup (100) rice koji (white or brown rice)

5 cups (1183 l) water, warmed to 135°F/ 57°C

 Optional: pinch salt, ½ teaspoon (2 g) vanilla

The process is simple, as you can see in the above video.

You will pour the oats, rice koji and warmed water into a 2-quart jar. You will keep this at 135°F/57°C for the next 6 hours. (This can be done in a dehydrator, immersion circulator, instant pot, towels and a warm oven, towels and hot water bottles in a cooler…whatever you have.)

After 6 hours you will put in the fridge for at least 24 hours and up to 5 days. It will get creamier with a few extra days. It can get a little lactic (sour) tasting if you let it get to cook during the 6-hour heat time. If it’s gotten cool, process sooner.  

When ready, blend it for about 30 to 45 seconds, or until oats are creamy. Strain through a nut milk bag and voilà (wa-lah) you have oat milk. This will keep in fridge about 5 days. It will separate and need shaking upon each use.

Use the strained-out solids in a sweet treat—part of the hydration of banana bread, or in oatmeal cookie dough.

Fermentation, over-carbonation, and explosions are real

swing top bottles with cider at Ferment Works

Swing-top glass bottles and fermentation go hand -in-hand. Many of us have had a scary explosion on the counter from too much pressure. Sugar and yeast ferments build so much more pressure than a fermented vegetable can and it can be dangerous. Back-sweetened ferments are the most dangerous. If the bottle has any kind of unknown weak point it can become a dangerous bomb. (Don’t use decorative squared sided ones for this reason.) for this I met Season at the Pittsburgh Fermentation Festival and she asked me is there a safe way to open a swing-top bottle? She proceeded to share this story with me. We talked about it. I wasn’t able to offer a lot. Though from my understanding of the physics of carbonation in liquid and how it will try to equalize as soon as it gets air, I think the fact that the bottle was only half full made the pressure worse. There are other options — recycled plastic soda bottles being the safest.

Season wants to bring awareness to the dangers, not to scare people, but just to remind them to be cautious. This can be making sure your beverages are fully fermented before long term bottling, keeping actively fermenting back-sweetened bottles in a plastic tub with a lid while fermenting and always chill before opening.

Without further ado, here is Season in her own words.

"I always told my husband if i ever needed stitches that he is to stitch me up himself and skip the expensive ER copay and the inevitably large medical bills that would follow. I mean, how hard could it be, right? This was assuming, however, that IF I were to ever need stitches, it would only be a minor cut that super glue just needed a little help with. 

Then...in March of 2019, I ate my words.

I had brewed a batch of kombucha a month or two earlier that I had forgotten about in a growler with a swing-top lid for its secondary fermentation. I knew it was likely to overflow once I opened it not only because it was in my pantry for so long but also being at room temperature. I was exhausted from a long day of cooking and cleaning and was finally ready to call it a night when I decided to check my forgotten kombucha. Before then, we had used plenty of old Grolsch bottles with swing-top lids in the past for other naturally carbonated beverages, and only ever had one explosion (I was well aware that "bottle bombs" were a thing, but they mostly seemed to happen on their own in someone's fridge or pantry, not while opening them). It had happened when we weren't home and with a batch of ginger ale made from my first ever ginger bug. It, too, had been sitting out at room temperature, but I just assumed I may have used a little too much ginger bug in the batch. Any other bottles we opened were just temporary geisers. 

This particular growler of kombucha was only half full, so I assumed there could only be so much pressure built up and it would be safe to open at room temp (but still done so over the sink). 

I couldn't have been more wrong. 

I began to slowly release the wire bail, waiting for the "pop". But, as soon as I could hear the faintest  hiss of air start to sneak its way out of the lid (the wire bail still being mostly latched), it was like a bomb suddenly went off. I looked down at my hands and the growler was just...gone. I thought I had felt something brush my cheek when it happened --pressure, not pain --, but my first thought after the explosion was, "oh, sh*t! I just made a HUGE mess!" Then I started to think about all the microcuts and glass that was probably embedded in my hands, but I couldn't feel anything. I didn't seem to have any cuts or any pain or irritations anywhere.

My husband inquired from the other room, "what was that??" As I started to answer him, I noticed blood on my hands. 

"Oh.. I'm bleeding," I said, more annoyed than concerned (blood doesn't bother me).

I moved my hands to the side into better lighting to take a look, and then I realized the blood wasn't coming from my hands...it was coming from my face. And it wasn't stopping.

"Oh my gosh, I'm REALLY bleeding...like BAD."

My husband rushed into the kitchen and, as soon as I saw the look on his usually jolly/light-hearted face, I knew it was bad.

"Oh, wow... you're REALLY bleeding. Put pressure here!" He grabbed my hand and showed me where to hold on my cheek, but then immediately grabbed my other hand to place on the same spot.

"No, you need to REALLY put pressure here...as much as you can." He firmly squished my face between my hands and his.

We didn't know it at the time, but facial wounds bleed like a mother because of all the vasularity. So, it was nearly impossible to stop the bleeding, which made it difficult to look for any other injuries. 

As he was gathering a few clean rags for my wounds (the wounds we could find, at least), I told him I think we need to call an ambulance, which was a big request from me. But this was bad. Really bad. I didn't even know a person could bleed that much and still maintain consciousness. 

As he was on the phone with 911, I made a point to not look in any mirrors or reflective surfaces for fear that the severity of my injuries might sway me towards going into shock. But then I realized...I  couldn't feel anything...at all. This cut on my face?  Nothing. The cut I just found on my arm? Zero pain. My neck could be sliced and I wouldn't even know it. Just as I came to that realization, I felt that hot/cold sensation of when all the blood rushes from your face -- as if I had just seen a ghost. I immediately yelled for my husband to check my throat.

"Is my throat slit?? I can't feel anything. Can you tell??"

He did his best to examine me through the mess, but I think we both just mostly HOPED I was in the clear.

I sat down and elevated my arm above my chest until the ambulance got there after noticing a healthy cut or two. When the medics arrived, I was beyond relieved. They were absolutely amazing. However... because it was St. Patrick's Day AND it was a growler that caused my injuries (and no one else knew what kombucha was), everyone quickly assumed that alcohol played a role in the accident (this was later the case at the hospital as well).

The doozy of a slice on my cheek was so deep that the medics were concerned it went the whole way through. I tried sticking my tongue out through the side of my face 

"Can you thee my dung?" 

Thankfully they couldn't, but we later found the thick chunk of glass that matched the pattern on my cheek.

The ambulance ride felt like a long one, but my co-pilot in the back, Philip, made sure my first (and hopefully last) ambulance ride was a good one. After realizing my injuries weren't deadly (*sarcasm*) we started cracking jokes back and  forth and even kidded about the awesome selfie opportunities this could give me.

After we made it to the ER and they examined my  whole body for cuts, it took a total of 27 stitches to  put me back together...8 on my arm, one on my chest, and the rest on my face. My husband was a pretty rambunctious fellow in his day, and I easily beat his stitches record in one night. And man, did I feel like it the next day. My face was so swollen that it was difficult to speak clearly.

I was extremely lucky with the outcome of this accident. Looking back, a lot worse could have happened. I could've been hit in the eyes and blinded. My neck could have been cut. Someone else could have been standing near me and also been injured. Our house's dimensions are 40x40 with an open floor plan. Due to the sheer amount of pressure that was built up in the growler, we were easily finding pieces of glass 20 feet from where I was standing over the next several weeks and months, and my cupboards now glistened from shrapnel if you looked at them in the right lighting. 

Now, when I look back on this day, I know there were some precautions I could have taken to prevent this. For one, I should have never let the secondary fermentation go on as long as it did (Master Procrastinator, here). Second, I should have refrigerated the growler over night to help reduce some of the pressure. Although, it is possible that this may not have made a difference if the extra head space from being half-filled actually allowed for MORE pressure to build up. I've since read of people opening suspected bottle bombs in buckets of water to buffer potential explosions, but, overall, there doesn't seem to be much in the way of safety information online for making fermented beverages at home. This was really concerning considering what I had just gone through. We may never know the exact reason for the explosion (was it the extra headspace? The over-carbonated kombucha? The sudden change in pressure from releasing the lid?), but we did learn from it. The hard way. And we certainly don't want anyone else to go through this. 

My story is not meant to scare people away from fermentation but to simply bring awareness to what *can* happen, especially if you leave a ferment unattended. I hope my experience will start a discussion on safety measures with using swing-top bottles for fermented beverages and how to safely handle suspected bottle bombs. We've personally chosen to stop using these type ot bottles (partly due to the psychological stress I experience around them now), but I don't feel this is necessary for everyone to do. Many people have used swing-top bottles for years without any issues -- but so had we. Fermentation is not an inherently dangerous process. But (much more minor) mishaps do occur. So let's work together to culture awareness in the fermentation community, but, most importantly, to keep fermentation fun and safe for everyone."


Season Petrovich, Owner
Cultures, LLC

Eat Natto and other Bacillus Ferments: Your heart will thank you!


Evidence suggests that eating natto* (or other B.subtilis soy ferments) can be one of the best heart healthy diet choices one can make. A massive study was released last week and reported on in the New York Times that singled out natto as the most significant factor in lowering your risk of cardiovascular disease. This was brought home to us this past summer when we were traveling and teaching about soy fermentation. A heart surgeon was at two of our classes in Ohio, because he believed in natto.

He explained to our wide-eyed class that when he “saws through a sternum” he can tell immediately what shape the patient’s cardiovascular system is in because if their bones feel brittle then he knows to be careful when clamping their veins. Because the calcium from the bones will be in the veins, he said that “feels like there are pieces of eggshells” floating inside with the blood. Those visceral descriptions of how something we cannot see feels got all of our attention. Keeping that calcium in your bones is also a benefit of natto. Studies also show it can stop osteoporosis in its tracks.

Let’s look at why natto? But first, we want you to understand that while this study focuses on natto, which comes from Japan, very similar versions of soy fermented with B. subtilis are found all over eastern Asia, southern Asia, and up into the Himalayas, as well as in central and west Africa. These are foods like kimena from Nepal, tua nao flavor disks from Myanmar and parts of Thailand, and cheonggukjang in Korea. In truth, other than the fact that these other ferments rely on “wild caught” local B. subtilis instead of inoculation, there is very little difference between them and natto — with warmth and time, beans (mostly soy) become sticky, somewhat stinky, and infinitely more digestible and healthier. We are talking natto because it is the most well known in the west and is therefore easier to source. Besides at your local Asian market there are some wonderful artisan makers that might just be in your neighborhood (if not they ship) NYNatto, Wanpaku, Megumi natto. Of course, once you are in the habit, you will want to make your own and our book will help you with that and tua nao or cheonggukjang.

The sticky part of these ferments contains the enzyme nattokinase – a natural blood thinning enzyme. We like to explain it as an enzyme with little scrubbers (not the science definition at all) cleaning out your veins by dissolving blood clots. Nattokinase is good for various veins and it can lower blood pressure and reduce the risk of stroke.

The other big part of these ferments’ superpower is just how much vitamin K2 it produces. These ferments are the richest source known for vitamin K2. For a great explanation of vitamin K and its relationship to natto head to this link by microbiologist turned natto maker Ann Yonetoni.

We know, some of us love natto and some of us cannot figure out how to get it past our mouths and into our bodies. It doesn’t matter if it is the texture or the flavor that is uncomfortable—no judgements here. What we can do is offer a way to sneak the good stuff in. You can think of it like vitamin gummies but instead its natto based cocoa bites. Seriously you won’t perceive the natto but soon your gut will. (We really need to do a whole other post about why it is our microbiome that dictates our cravings.) Just know, the probiotics in this ferment will help there too. Without further ado, we want to share a chocolate treat to make for your love’s heart. This and other recipes for making and eating these ferments can be found in Miso, Tempeh, Natto and other tasty ferments.

*Natto is a traditional Japanese fermented soy bean dish. It is characterized by it’s deep umami and stringy texture. It is an alkaline ferment.


Christopher teaches you how to make natto tasty for even the most discriminating of eaters! Get ready to enjoy your daily natto.


Behind the Scenes of Miso, Tempeh, Natto and other Tasty Ferments

This video is a conversation about the making of the book Miso, Tempeh, Natto, and Other Tasty Ferments. It is an invitation to meet us as fermentation authors and learn a little bit about our journey writing this book, which became a 2019 Foreword INDIES Winner and a 2020 IACP Cookbook Award Finalist.

We have given a signed copy of every one of our books to Christopher’s mom, who then dutifully reads them cover to cover and does the mom thing, praising the pictures and forgetting the words. Being the authors of the words, and not the photographers of the photos, its a mixed praise. Miso, Tempeh, Natto, and other Tasty Ferments was something different for Patricia. It was a slog, a forced march through a world in which she saw nothing familiar, nothing from her cooking experience, all foreign.

Maybe you grew up like Kirsten and have enjoyed a varied diet with lots of other culture’s favorites showing up at your table, so much so that you see all cuisines as interesting, flavorful, and worth exploring. Or maybe you grew up like Christopher, eating what your parents ate, which is what their parents ate. Anything outside of this is something new, something you have no experience with. Kirsten grew up living in lots of places, including Southeast Asia. Christopher grew up in Missouri and the closest he got to Southeast Asia was watching M.A.S.H. reruns. Maybe you and your partner came from these two different food worlds, as we did, and have made your own unique food traditions.

Food is a tool for exchange of culture. - David Zilber, who wrote the foreward

This book is in-depth but its also approachable, breaking down everything into step-by-step techniques for fermenting beans and grains in your home kitchen, with minimal new equipment. There are more than 50 recipes for using these ferments in condiments, dishes at every meal, even dessert. Chocolate miso babka is something Christopher still wakes up thinking he will make, no, that he needs to make that day. Ferments can change your life.

If you prefer learning with a class check out:

  • Tempeh Masterclass, where you will learn everything you need to know to easily make delicious tempeh at home. For vegetarians, vegans or anyone looking to eat a little less meat in their diet tempeh can easily become your go-to protein-rich main course.

  • How to Make Miso class, where you learn to ferment miso paste from scratch at home safely and successfully. This beginning class will get you started by understanding koji and everything else you need to know to make traditional style miso and modern style tasty pastes.

  • Yes, natto is coming so stay tuned!

Making Sourdough Bread Comes Full Circle

Learn to make tasty sourdough at Sourdough School House

Learn to make tasty sourdough at Sourdough School House

Sourdough is the ultimate fermented bread. A good starter has a unique mix of yeast and bacteria that have honestly worked it. Microbes are not looking to be cooperative, they are all trying to feed themselves, but in a sourdough starter, the populations have come to a harmonious place that is delicious!

Not to mention healthy!

Did you know some of the most exciting research in reducing gluten in wheat comes from the University of Bari in Bari, Italy? In 2006 they reported a breakthrough. By utilizing 10 lactobacilli species typical in sourdough fermentation and fermenting wheat for 24 hours in a very wet mixture, they were able to nearly totally hydrolyze the gluten — so much so that when they created baked products with the sourdough and fed them to confirmed celiac disease patients, those patients reported no adverse effects[i]. While their results were encouraging, they hinted in the report that they were working on something even better: combining the lactobacillus with fungus. For obvious reasons, we got pretty excited about this and began searching for their more recent work. What we found was pretty incredible. In a study in 2010 [ii], researchers refined the lactobacilli mix and added Aspergillus oryzae and Aspergillus niger; the result was a reduction in the gluten in the wheat flour from 103,127 parts per million (ppm) to 10 ppm. That is half the typical lowest detectable concentration level of 20 ppm and was shown to be digestible by participants with celiac disease with no adverse reactions. Researchers continue to refine the process and the team of microbes being used, but it gives the estimated 1 percent of the planet’s population that suffers from celiac disease — plus the many more that suffer from gluten intolerance — hope that their gluten-free baked goods will no longer necessarily equate to wheat-free.

Christopher is the baker in our family. For years he made all of our bread, and then, who knows why our habits changed, and he stopped. Luckily we had a delicious local baker and didn’t think much of it. In the last few weeks, though, Christopher has been back to baking all of our bread. As I write this, the house smells of the bread baking; yes, hot buttered fresh bread is for breakfast. We will never be sourdough teachers, but there are some great bakers out there teaching all the wonders of baking with sourdough. We love the book SOURDOUGH by Sarah Owens. There is also a great class on Rye Sourdough at The Fermentation School.

[i] [[Gobbetti 2007]]

[ii] [[Di Cagno 2010]]

The Magic of Koji

In this 45-minute talk at the 2019 Boston Fermentation Festival Kirsten gives an overview of Aspergillus Oryzae, also known as koji, the mold with superpowers. In this introduction to koji will learn how koji works by creating the enzymes that infuse our food with flavor

Once Koji grabs your soul, there is no turning back.
- Jeremy Umansky, Larder, Cleveland

What is Koji?

Koji is a filamentous mold that grows on the surface of its host, exuding powerful enzymes to break down complex molecules. As you can see in the picture that follows the Koji fungus is beautiful. Here you can see it takes hold of the soybeans and is spreading across the cracked wheat. This surface mold is secreting powerful enzymes to break down large starch, carbohydrate, protein, and lipid molecules into their smaller and more flavorful component parts.

Koji spores growing on soybeans and cracked wheat in our kitchen at FermentWorks

Koji spores growing on soybeans and cracked wheat in our kitchen at FermentWorks

How does Koji Work?

In a word, enzymes! Enzymes snip apart large molecules into smaller pieces.

  • Proteins become Aminos & Peptides

  • Carbohydrates become simpler sugars

  • Fats become fatty acids

The ordinary becomes amplified; the one-dimensional becomes multi-dimensional!

Learn to speak Koji

We know, its can get confusing, especially if all of this fungal ferment world is new to you. Here is a simple koji definition guide that you can save a link to and pop open a tab when you are reading that latest 7 things that blah blah blah and they mention a Koji term. You will discover they are not always using them correctly…

koji

Koji is the Japanese word widely used throughout much of the world that refers to Koji that has been grown on rice. Some other terms you will see that mean the same thing are kome-koji, koji rice, and malted koji.

Koji-kin

So if Koji refers to the fungus that has grown on rice, Koji-Kin refers to the mold itself, regardless of the substrate, be it rice or anything else.

tane koji

Tane Koji takes us to the source of the above two terms, the spores themselves that come in the starter you order online.

mycelium

Looking closely at that picture above and thinking about our Koji-kin fungus growing away in your incubator the fungus mycelium is the vegetative part of the fungus, made up of filamentous ‘hypha’ and is the part we mostly see with our eyes.

Hypha

Each filament of the Mycelium, the plural for these is Hyphae. You could think of these as the roots of a plant you are familiar with.

koji

koji

People + Koji = Tasty Foods

You have hopefully learned a little more about what koji is and how it works in this post. If you are ready to learn more and use koji to make something we have two great classes to suggest in The Fermentation School.