foraged ferments

Preserving Mint with Fermentation

Fermented Mint and Ferment'n Home Fermentation Kit

The idea of foraged and found ferments has been on my mind a lot lately. I have been experimenting with more and more wild ferments in my own corner of the world while out there my global Internet buddies are doing the same. Colleen Codekas is working with cattails and Annie Levy is also experimenting with foraged ferments.

Finding small nourishment from wild plants is seasonal eating at its finest. It is interesting to watch the plants (and animals) and see how they react with the subtle changes in seasonal conditions. A good friend of mine spent a lot of time rehabilitating the creek on her property (translated this means a few years of tenacious blackberry removal.) I watched as the native plants came back to the land—trillium, California spikenard, hedge nettle, cleavers, and many others. One summer we were inundated with thick smoke from forest fires for over a month.  It was then that she noticed that the coltsfoot completely disappeared. She then observed a lone squirrel inside a thicket of willow stems tearing off small strips of the coltsfoot leaves and eating one after the other. Herbal medicine recognizes coltsfoot as a lung herb.

Our days have been unseasonably hot this summer and hovering around 15° F above normal—today it will be 108° F. (We live in Oregon not the Sonoran Desert.) Luckily our mountain mornings are still cool if we get up early enough. We do our chores and any gardening before breakfast. Recently, I was back inside bracing for another scorching day when Christopher came into the house like a cool minty breeze—literally. He had been out foraging for the goats* and had tramped through a patch of wild mint. That smell reminded me of the cooling nature of mint. Mint is refreshing and finds its way into many cuisines where the climate dishes out heat.

As soon as breakfast was consumed I went out to the small spring fed riparian area below our house and picked a basket of mint. It has been fermenting for two weeks and is now finding its way into all sorts of cool no-cook meals—most recently a chilled cucumber yogurt soup. Without further ado I present you with a recipe for fermented mint leaves.

Fermented Wild Mint
Makes about a half pint

Find wild mint along water ways; if you don’t have access to that, garden mint works just as well. The most important thing is that the mint has not begun to flower. Be sure to use the larger leafed mint (link) and not the small leafed wild pennyroyal (link), which can be toxic. The other thing about the wild mint that I have been using is that it is drier and the leaves did not release enough water to even dissolve the salt properly—hence the brine. 

8 ounces mint leaves, stems removed
½ teaspoon salt dissolved in 1/8 cup of unchlorinated water

Roughly chop the mint leaves and add salt-water solution. Massage this brine into the leaves (your hands will smell great) and allow to sit in a bowl, covered for about a half hour to work out more brine. 

Press into a jar. Top with a ziplock bag, or pack tightly into a small jar for the burp method, or use your favorite fermenting system. 

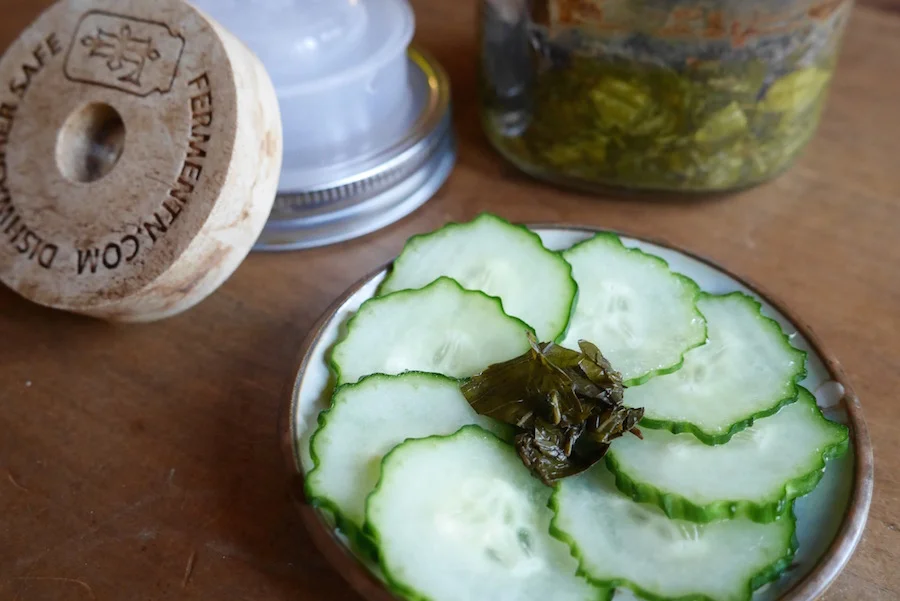
This will need to ferment about 2 weeks. You will know it is ready when the mint has turned color from the bright dark green freshness to a dull dark green, as in the photo above. It will taste lightly acidic. Refrigerate when ready to store. It will keep for at least one year. 

The ferment kit pictured here fermenting the mints appears to no longer be available.

*I know that sounds a little crazy but when we are on top of things we stack functions, in other words we feed our goats the blackberry canes that are always threatening to hide our fences and choke our waterways. It is better food for the goats than baled hay and helps us keep up with the blackberries an armload at a time. It’s also important to note we are not homestead overachievers we are generally not that organized.


First Signs of Spring :: Fermenting Dandelion Buds

dandelion bud on a frosty morning

dandelion bud on a frosty morning

Kirsten writes :: Here in Southern Oregon the first dandelions have begun to bloom. Christopher and I had very different early relationships with spring dandelions. His father saw their appearance as time to tame the lawn while my mother saw them as a bounty to harvest.

Our first house as a young couple was a little saltbox in Boise with a backyard that the previous owners had planned to pave for a big shop. Thankfully they didn’t get that far.

The first spring there we picked and shoveled our way to the soil. The yard responded to the change in stewardship by celebrating with a riot of dandelions, which I proclaimed to be our first crop. When I was young, we lived in married student housing on the Cornell campus. There were vast lawns out the back door polka dotted with yellow dandelions. In the early spring my mother would pick the flower buds and sauté them in plenty of butter and garlic. When the flowers bloomed she made fritters. I don’t remember the flavor. I do remember the magic of eating off the lawn. Naturally I wanted to share this joy with our son.

Christopher writes :: I was skeptical but when I heard this project involved batter and frying I was game. We had just settled into a mound of fried dandelion blossoms out on the back patio when we heard the old wooden gate complaining and in came my father. By then I had downed a few of the golden beauties and I was eager to share my revelation with the man that had spent my childhood spraying, forking and mowing these delicious plants.

“Hey Pop, try these–they’re great!” I said, standing up and holding out my plate to him.

“What are they, morels?” he asked hopefully, reaching for a crispy blossom.

“No they’re dandelions!” I proudly announced.

My father’s hand stopped mid-air as he scanned my plate. I watched as he slowly looked past me. Turning, I saw our son in his cloth diaper sprawled out on the cool concrete of the patio, digging into his portion.

“Are you are feeding the baby weeds?” he asked us, clearly not wanting to believe his eyes.

By the time we thought of foraging dandelions to ferment, our toddler had three younger siblings and had entered college. There were many trials that included everything but the fluff—bud, leaf, and root. While we acknowledge the incredible health benefits of fermenting the greens we just don’t love (or even like) the bitter flavor, which isn’t mitigated at all by fermentation. (The best way to use the leaves is as small part of a batch of cabbage sauerkraut or spicy kimchi.) It is once again the blossom buds that have us eating from the yard.

 Dandelion buds in brine ready to start fermenting


Dandelion buds in brine ready to start fermenting

Fermented Dandelion Flower Buds

Make in a pint jar

When selecting flower buds to pickle, be sure to pick buds that are still tightly closed, not flowers that have simply closed for the night, which will have bits of petals sticking out. Use these small pickles as you would capers.

2 cups dandelion buds

1–2 heads garlic, broken apart and peeled

1 onion, sliced in wedges

1 (1–inch) piece fresh ginger, chopped

2 tablespoons red goji berries

1 cup Basic Brine (1/2 tablespoon unrefined sea salt to 1 cup unchlorinated water)

Combine the dandelion buds, garlic, onion wedges, ginger, and goji berries in a bowl. Transfer to a quart jar and pour in the brine to cover the mixture completely. The dandelion buds will want to float; place some of the larger onion wedges on top to keep everything under the brine. Reserve any leftover brine in the fridge to top off while fermenting. (It will keep for 1 week; discard thereafter and make a new batch, if needed.)

Follow with your favorite follower and weight, or use a water-filled ziplock bag. This steep is important to prevent the small ingredients from floating out of the brine. Remember: Submerge in brine, and all will be fine.

Set aside on a plate to ferment, somewhere nearby and out of direct sunlight, in a cool spot for 5 to 7 days. During the fermentation period, monitor brine level and press buds back into brine or top off with the reserved brine solution, as needed. You may see foam on top; it is harmless. As the vegetables ferment, they begin to lose their vibrant color and the brine will get cloudy; this is when you can start to test your pickles. They’re ready when: The buds are dull green, the goji berries are plump but still bright orange red and the brine is cloudy. The flavor of the buds and the brine are slightly sour, with ginger and garlic notes, 

Store in the fridge in the same jar, lid tight. These will keep for about a year. Enjoy them sprinkled on salads, added to a sandwich spread such as chicken salad, or simple pluck out of the jar for a little pickle-y treat.