Aged Fermented Thai Red Curry Paste

How to know when old ferments are still good? That is a question many of ask when we find a jar we didn’t remember we had. Lost and found ferments are real. We all have ferments that slip quietly to the back of the fridge where they get forgotten. In the spirit of full utilization and not wasting food I want to help you figure out what is still good (and maybe even tastier!) and what should be thrown out.

How a ferment ages depends very much on what kind it is. The original ingredients will determine a lot about its longevity. Miso and other bean ferments generally keep aging and layering on flavor. These may have a layer of mold growing on them but underneath they are still safe. Vegetables are quite variable in that they can still be technically “good” but no longer vibrant. I find a sauerkraut that is over a year old is generally of this ilk. Whereas a chile pepper based ferment has compounds in it that give it years of delicious longevity. Check the last post about creating hot sauce from old fermented pepper pastes. I also find herbal ferments like basil or shiso have a much longer lifespan do to the constituents that make these herbs antimicrobial. To learn more about fermentation methods head to Fermentation School.

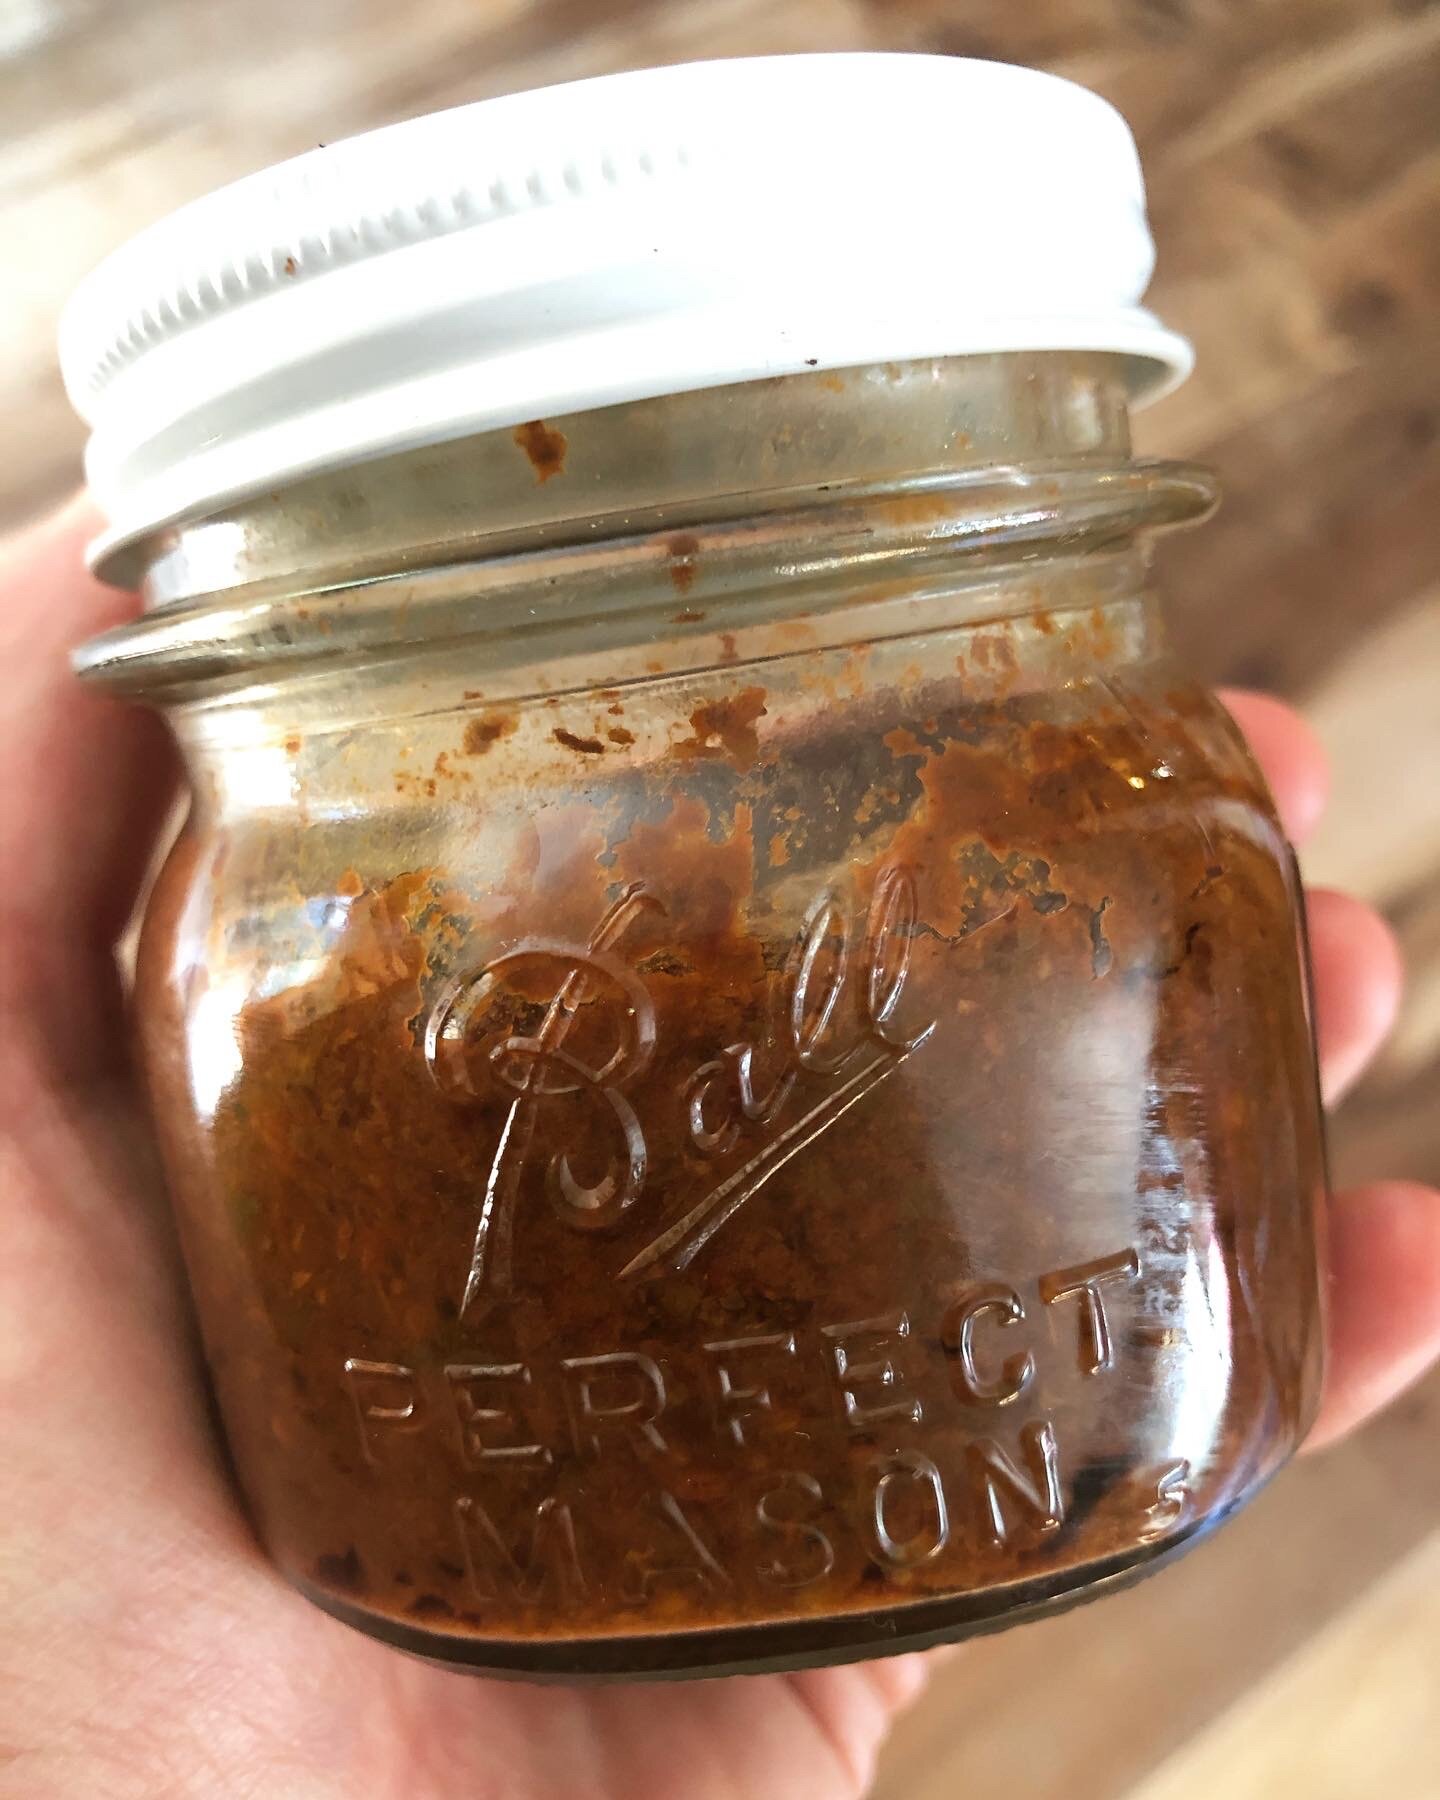
This fermented Thai Red Curry Paste is an example of a ferment that had both antimicrobial preservation ingredients and chiles. I found it recently in the recesses of the fridge. It was made in 2015. To be fair, not the daily fridge, one of the ferment fridges where things get “lost and found” often. This recipe is from Fiery Ferments and took inspiration from one of our favorite flavors and lacto-fermented it. Early in the ferment it doesn’t taste as good, it gets better with age.As the fermentation continued, the flavors blended and created a pleasing complex red curry flavor. So hence making it and putting it away for 6 months, um or 5 years. What do you do? Make curry. Below is the recipe for your enjoyment, go ahead hide it in the back of the fridge after it has fermented to discover later.

To evaluate your old ferment for “good” you will use your senses and trust your gut. Properly fermented the pH will have been below 4.0 this ensures that harmful bacteria will not live in the ferment. (You can test with a pH meter or test strips.) You will also know because it will be pleasingly acid — think pickles. If the ferment is still anaerobic (under the brine and no airpockets) then it is also a good sign. There may be yeast, even mold on top but that can be removed. As long as it is just on top and the rest is anaerobic it is fine. Then of course there is smell, does it still smell fine—not foul, putrid, musty or off? If so you can move to a small taste, this will give you a lot of information. It should taste fine. If it does not, then it is not.

RECIPE FOR FERMENTED THAI RED CURRY PASTE

Thai pastes are traditionally ground together with a mortar and pestle. We mention this because there is a texture difference: the fibers of lemongrass and roots don’t break down as much in a food processor, though the flavor will still be delicious.

3 tablespoons fresh lemongrass, chopped

1 medium shallot, or 4 tablespoons, chopped

9–10 diced Thai type small red chiles, deseeded, soaked, and drained

1/3 cup loosely packed cilantro, chopped, with root when possible

8 medium cloves garlic

2 tablespoons galangal, grated

1–2 kaffir limes (also called makrut limes,substitute regular limes if unavailable)

1/2 tablespoon kaffir lime zest (take care not to zest the bitter pith)

2 teaspoons kaffir lime juice

1 1/2 teaspoons salt

1. Process all the ingredients to a paste consistency in a food processor. Sprinkle in the salt. It will become juicy immediately.

2. Pack the paste into a jar that is just the right size for your ferment, leaving at least an inch of headspace, release any air pockets as you press it in. The thick brine will be hard to distinguish from the rest of the paste.

3. Press a piece of parchment paper (or other cartouche) against the surface, being careful not to trap any air beneath it. Screw the lid down tightly.

4. Put the ferment in a corner of the kitchen to cure, and watch for air pockets forming in the paste. If you see them, open the lid and press the paste back down. If the lid starts to bulge, simply open it for a moment to “burp” the ferment.

Myanmar-Style Shan Soup Recipe

IMG_2995.jpeg

This soup also is a preview of a simple legume ferment from our upcoming book on fermented legumes and grains. We are super excited to announce that is what we have been working on all year (much of why you haven’t heard much from us.) Just this week it is out there in the big world with a beautiful cover and ready for pre-order. In it we have taken the mystery out of some of the world’s most delicious and unique ferments—including koji, miso, natto, and tempeh—making them easy with step-by-step instructions.

We hope you enjoy the recipe and the soup warms you up.

Cheers,

Kirsten and Christopher


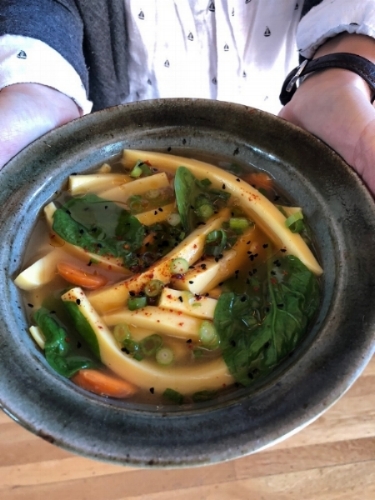
Myanmar-Style Shan Soup

Yield: 4 good-sized bowls of porridge

Fermentation: 12 hours for the first ferment and 3 hours for the second

Gluten-free, vegan

During our trip to Myanmar, we had planned to visit the region in the northern part of the country where tea leaves are fermented, which is home to many different ethnic groups, several with their own standing armies. We had to change our plans at the last minute because fighting broke out between Myanmar’s government army and one of those regional armies, cutting off our access to the tea villages. We found tea plantations and the fermentation we were seeking, including this tofu, in other parts of the country.

In Burmese, this soup is called hto-hpu new, which either means warm tofu or hot tofu. We got various translations and, depending upon where we were eating it and which hot chile had been added, it did range from warm to very hot. This is a great base for some interesting soup bowls.

8   cups water

2   cups chickpea/garbanzo flour

1   tablespoon peanut oil

1   teaspoon salt

½ teaspoon powdered turmeric

Hot sauce (optional), for topping.

Chopped cilantro, cooked rice noodles, chopped roasted peanuts, blanched greens, or finely sliced shallots (optional), for topping

1.  Pour the water into a large bowl. Add the chickpea flour and whisk until well combined. Cover the bowl with a plate or lid and let ferment at room temperature for 12 hours.

2.  Stretch a piece of cheesecloth across another large bowl and secure with a rubber band. Pour the chickpea batter through the cheesecloth into the bowl. This may take a little time and patience. It helps to have a rubber spatula handy to periodically scrape the the cheesecloth to remove the chickpea sediment. Compost the chickpea sediment. Cover the bowl of broth and let ferment for 3 hours at room temperature.

3.  Pour the oil into a heavy pot and rub it around to coat the bottom and sides. Stir the chickpea broth and pour all of it into the pot. Stir in the salt and turmeric.

4.  Bring the mixture to a boil over high heat, then reduce the heat to medium-low and cook at a slow boil until thickened and slightly reduced, 20 to 25 minutes. Stir continuously with a spatula to keep the mixture from sticking to the bottom of the pot.

5.  Remove the pot from the heat and serve the soup immediately, topped with a drizzle of hot sauce, if you like, and your favorite fresh toppings.


Fermented Valentine! Chocolate Cranberry Mole

Fermented Chocolate Cranberrry Mole

If you are looking for something new and crazy, a bit spicy, a bit sweet, but complete with requisite Valentine’s chocolate, look no further—it is time for saying love with a fermented valentine.

Love your sweetie—love their guts!

Chocolate Cranberry Mole

Yield: About 1½ pints

4 cups (1 pound) fresh cranberries

1 cup dried cranberries

½ cup dried unsweetened cherries (or increase dried cranberries)

5 tablespoons (2 ounces) pasilla chile powder

2¼ teaspoons cocoa powder

¾ teaspoon salt

½ cup fresh orange juice

Process all of the ingredients to a paste consistency in a food processor. Sprinkle in the salt, since the cell walls of the ingredients are already broken down the paste will become moist right away. However, this type of ferment will not look juicy, instead it will be drier than you think is possible. Press the paste into your favorite fermentation vessel. Follow the instructions that come with that vessel. Otherwise choose a jar that is just the right size for your paste. 

Press the mixture into the jar, there won’t be an obvious brine; when you have pressed the paste into the jar releasing any air pockets, press a piece of plastic wrap against the surface, again without trapping any air. Screw a lid tightly on the jar.

Put this in a corner of the kitchen to cure. Watch for air pockets forming in the paste. If you see them open the lid and press the paste back down. If the lid starts to bubble up, simply open the lid for a moment to “burp” the ferment.

Allow to ferment for 7–10 days. You will know it is ready when the cranberries have a delightful lemony flavor and all the elements have mingled together.

Keep a small round of plastic or wax paper directly on top of the paste to prevent evaporation and contamination. Tighten the lids, then store in the fridge. This ferment will keep refrigerated for 12 months.

Fermented Fennel Cranberry Chutney

Lacto fermented fennel recipe below

Lacto fermented fennel recipe below

I taught a class where we made fermented Fennel Cranberry Chutney at the Farm to Fermentation Festival* in Santa Rosa, CA. This festival is near and dear to my heart as it is the first fermentation festival I’d ever been to back in 2011. In 2011 it was called the Freestone Fermentation Festival, which I wrote about extensively on this blog—the symposium, the feast, and the fest. The event has changed but is at its core still a wonderful way for people to explore the wonderful world of fermented foods and libations. 

The best part—always—is meeting and teaching you, the people, how to ferment vegetables.  [Since this post the world has moved to pandemic measures and no in person gathering. I miss the gatherings and live classes but I do love that my teaching is now available to anyone with an internet connection. Click here for my online vegetable fermentation classes hosted at Fermentation School.)

This recipe is in Fermented Vegetables but I made a pint size version for the class that I want to share here.This ferment is mild, sweet, and delicious and a friendly flavor for those who are less sure about fermented vegetables in their diet. This is particularly good with poultry—as an addition to a chicken salad or along side grilled chicken.

Fermented Fennel Chutney


Makes 1 pint

This version uses optional pure cranberry juice. The juice adds a little more flavor complexity, pink color and brine. The recipe works either way.

1 bulb fennel, sliced finely, tough parts of core removed
1 small to medium sweet onion, slice finely
3 cloves garlic, minced
¼ cup dried cranberries
2 tablespoons raisins
1 teaspoon salt
optional:
2 tablespoons pure cranberry juice (the kind with nothing added)

Remove the fennel stalks (save for adding to soup stock) and any tough parts of the core. Slice the fennel and onions as thinly as possible; mince the garlic and place in bowl. Sprinkle in the salt and massage it in to release the juices. Add the cranberries and raisins. At this point you should have a moist mixture. Press into your favorite fermentation vessel. Follow the instructions that come with that method. Otherwise choose a jar that is just the right size.


Press the vegetables into the jar; there will be only a small amount of brine. Don’t worry if it “disappears” between pressings. As long as the relish is damp, you have enough. At this point you can add the optional cranberry juice—it will give you more brine and a nice pink color.
When you have pressed the chutney into the jar releasing air pockets, press a piece of plastic wrap against the surface, again without trapping any air. Screw a lid tightly on the jar.


Put this in a corner of the kitchen to cure. Watch for air pockets forming in the paste. If you see them, open the lid and press the paste back down. If the lid starts to bubble up, simply open the lid for a moment to “burp” the ferment. 


Allow to ferment for 7 days. You will know it is ready when the color of the ferment has become dull and there is a slight pickle-y flavor.


During storage, the less airspace above a ferment the longer it will last, so fill the jars to the rim and transfer the ferment to smaller jars as you use it. Keep a small round of plastic wrap or wax paper directly on top of the paste to prevent evaporation and contamination. Tighten the lids and store in fridge. This ferment will keep refrigerated for 6 months.

*Since the writing of this post this festival in any form is no longer happening.

Preserving Mint with Fermentation

Fermented Mint and Ferment'n Home Fermentation Kit

The idea of foraged and found ferments has been on my mind a lot lately. I have been experimenting with more and more wild ferments in my own corner of the world while out there my global Internet buddies are doing the same. Colleen Codekas is working with cattails and Annie Levy is also experimenting with foraged ferments.

Finding small nourishment from wild plants is seasonal eating at its finest. It is interesting to watch the plants (and animals) and see how they react with the subtle changes in seasonal conditions. A good friend of mine spent a lot of time rehabilitating the creek on her property (translated this means a few years of tenacious blackberry removal.) I watched as the native plants came back to the land—trillium, California spikenard, hedge nettle, cleavers, and many others. One summer we were inundated with thick smoke from forest fires for over a month.  It was then that she noticed that the coltsfoot completely disappeared. She then observed a lone squirrel inside a thicket of willow stems tearing off small strips of the coltsfoot leaves and eating one after the other. Herbal medicine recognizes coltsfoot as a lung herb.

Our days have been unseasonably hot this summer and hovering around 15° F above normal—today it will be 108° F. (We live in Oregon not the Sonoran Desert.) Luckily our mountain mornings are still cool if we get up early enough. We do our chores and any gardening before breakfast. Recently, I was back inside bracing for another scorching day when Christopher came into the house like a cool minty breeze—literally. He had been out foraging for the goats* and had tramped through a patch of wild mint. That smell reminded me of the cooling nature of mint. Mint is refreshing and finds its way into many cuisines where the climate dishes out heat.

As soon as breakfast was consumed I went out to the small spring fed riparian area below our house and picked a basket of mint. It has been fermenting for two weeks and is now finding its way into all sorts of cool no-cook meals—most recently a chilled cucumber yogurt soup. Without further ado I present you with a recipe for fermented mint leaves.

Fermented Wild Mint
Makes about a half pint

Find wild mint along water ways; if you don’t have access to that, garden mint works just as well. The most important thing is that the mint has not begun to flower. Be sure to use the larger leafed mint (link) and not the small leafed wild pennyroyal (link), which can be toxic. The other thing about the wild mint that I have been using is that it is drier and the leaves did not release enough water to even dissolve the salt properly—hence the brine. 

8 ounces mint leaves, stems removed
½ teaspoon salt dissolved in 1/8 cup of unchlorinated water

Roughly chop the mint leaves and add salt-water solution. Massage this brine into the leaves (your hands will smell great) and allow to sit in a bowl, covered for about a half hour to work out more brine. 

Press into a jar. Top with a ziplock bag, or pack tightly into a small jar for the burp method, or use your favorite fermenting system. 

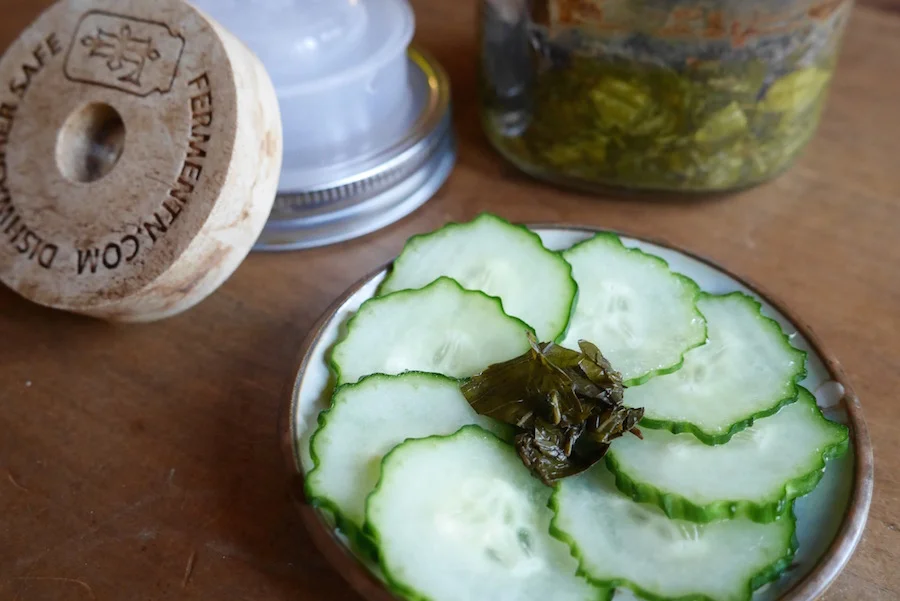
This will need to ferment about 2 weeks. You will know it is ready when the mint has turned color from the bright dark green freshness to a dull dark green, as in the photo above. It will taste lightly acidic. Refrigerate when ready to store. It will keep for at least one year. 

The ferment kit pictured here fermenting the mints appears to no longer be available.

*I know that sounds a little crazy but when we are on top of things we stack functions, in other words we feed our goats the blackberry canes that are always threatening to hide our fences and choke our waterways. It is better food for the goats than baled hay and helps us keep up with the blackberries an armload at a time. It’s also important to note we are not homestead overachievers we are generally not that organized.


Fermented Nettle Kimchi

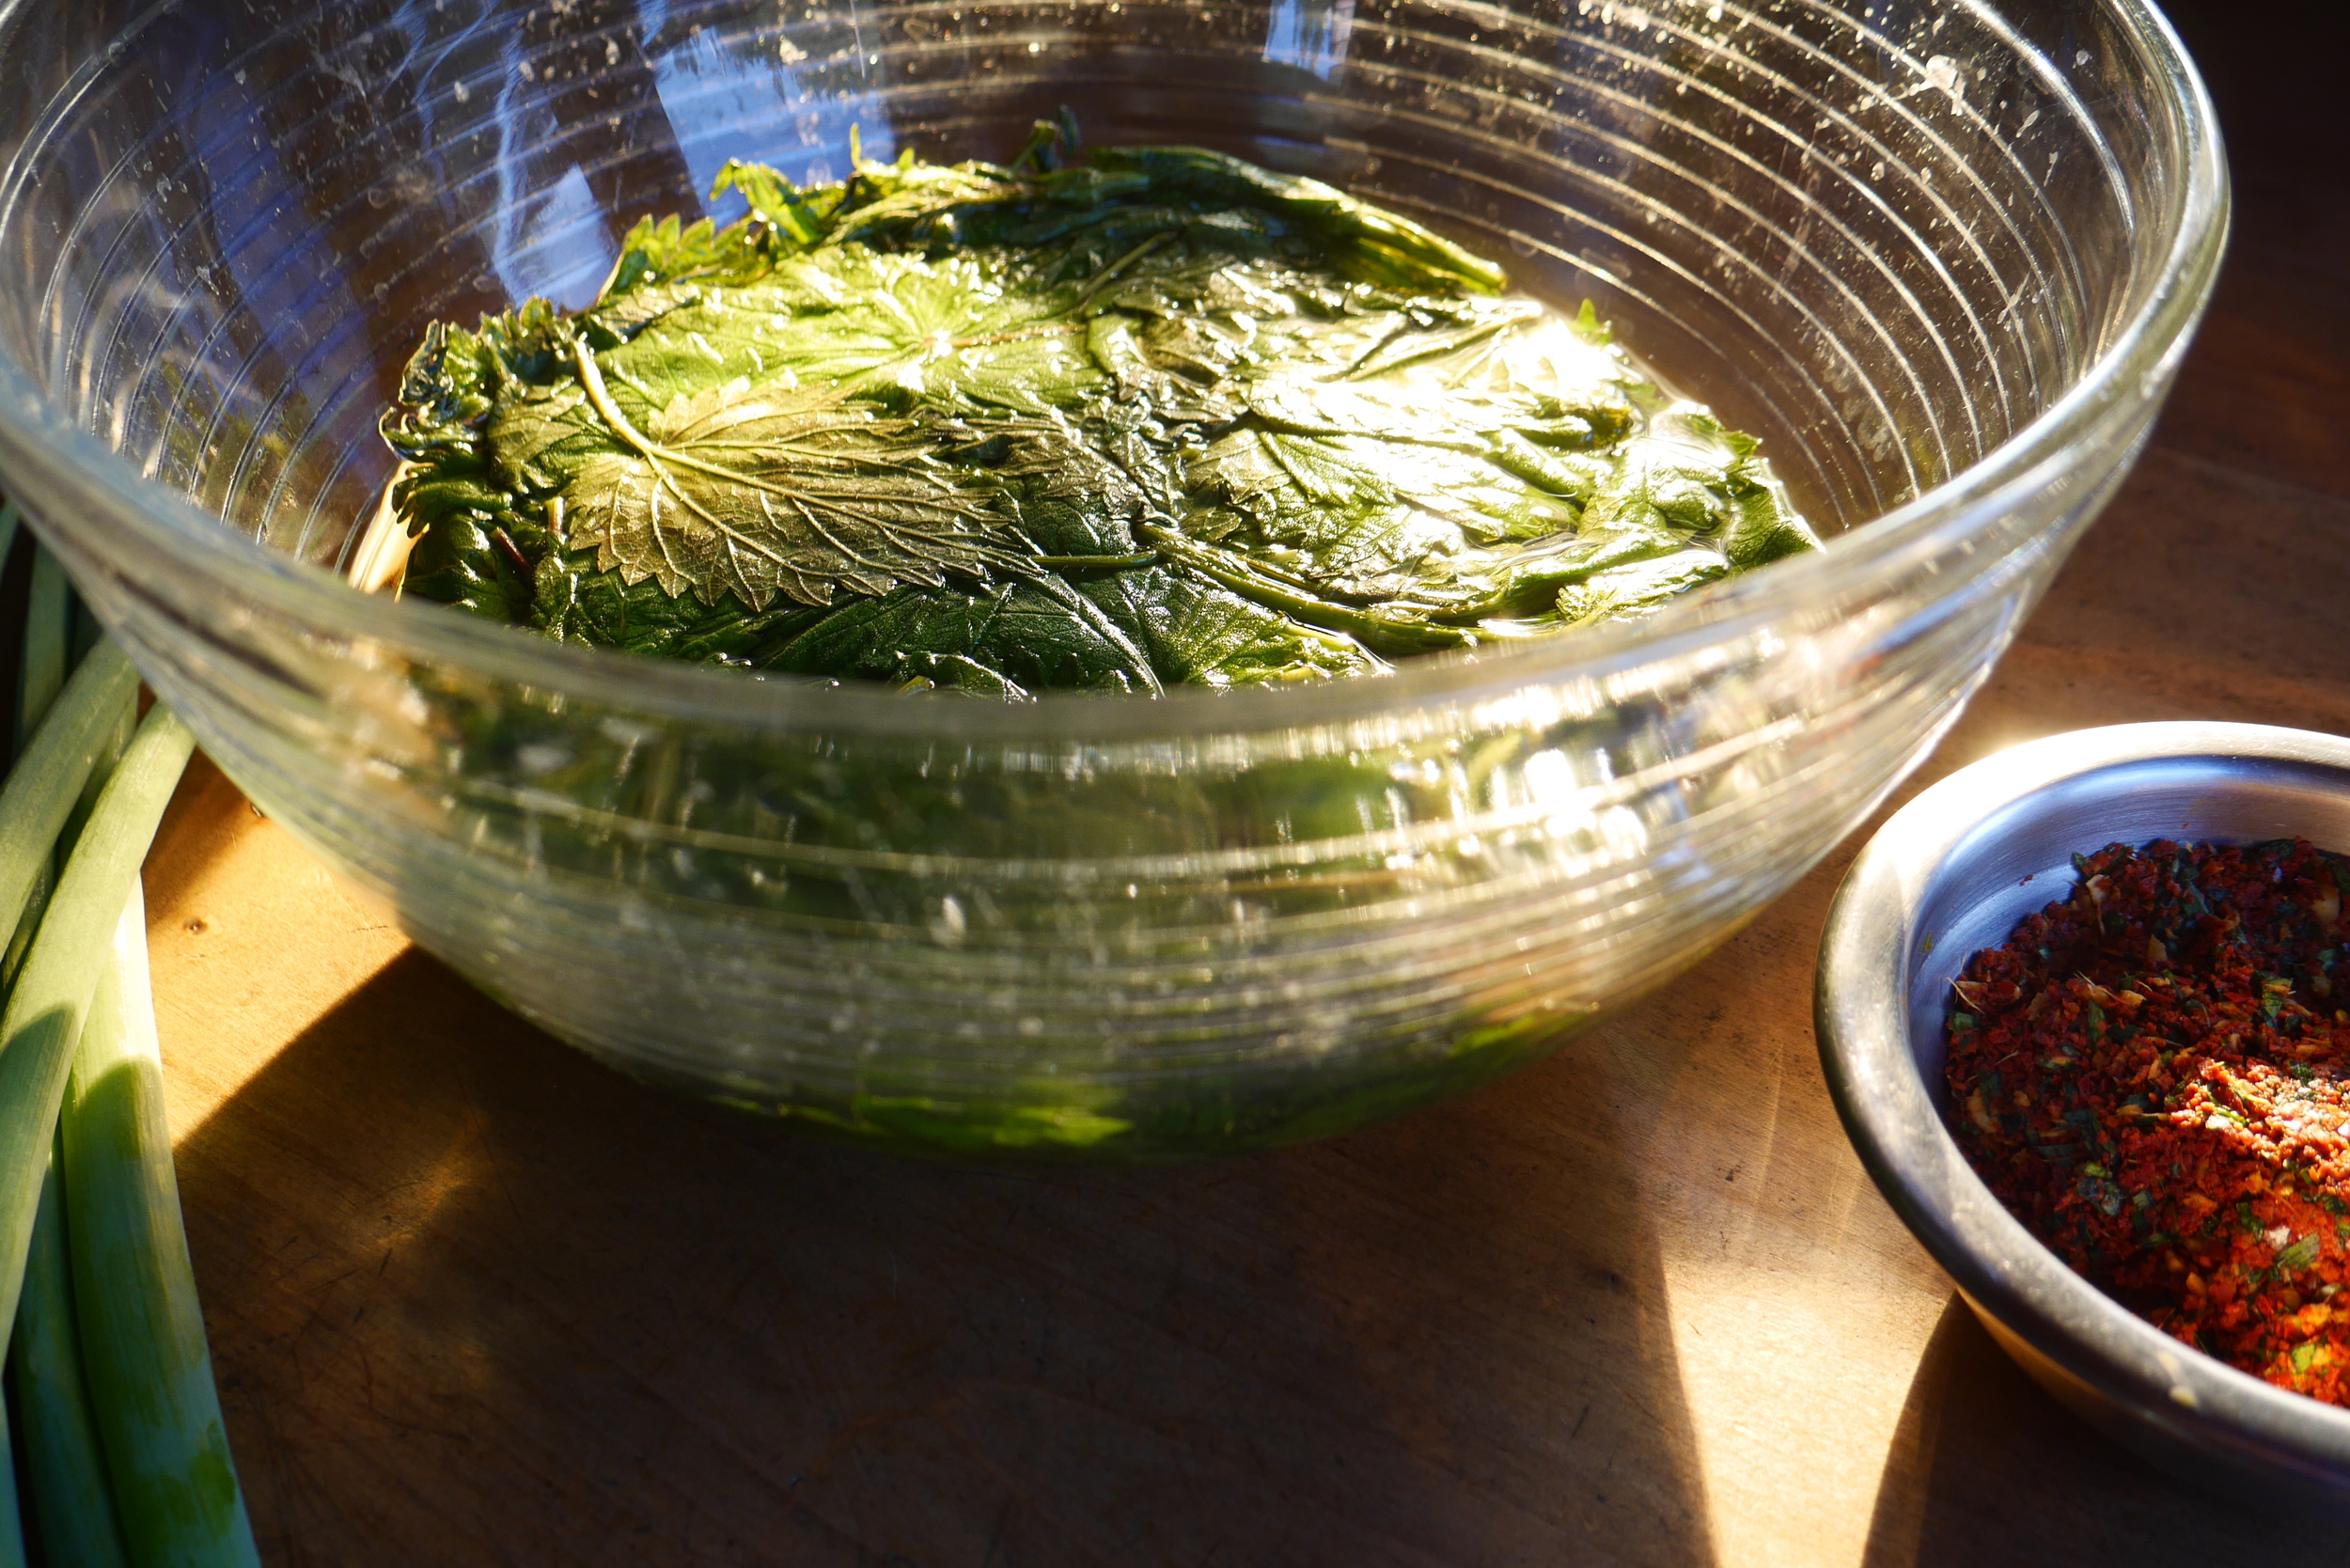
The morning after...nettle leaves soaking in a brine bath overnight—ready to become kimchi.

The morning after...nettle leaves soaking in a brine bath overnight—ready to become kimchi.

Living as we do on land at the edge of wilderness, has infused a much closer relationship to the rhythms of the year and subtleties of each individual season. This year, for example, our landscape donned the growth of spring a full month earlier. An important early harvest is the wild nettles that grow in a patch along the creek that runs through our property. Nettle kraut is a standard favorite and it is easy to stick to what I know we love. This year I knew it was time to do something different. On a bright morning Christopher and I headed to the creek with snips, a basket, each wearing long sleeves and good gloves. 

I find harvesting nettles thrilling (maybe we’ve lived out here too long); on this day there was extra excitement. As we walked through the thicket of young cedars we happened upon two freshly killed wild turkeys; one was half-eaten, the other was still warm. It was the middle of the day and we wondered what predator we might have scared off—likely a coyote. However, we do live in cougar country and when we got to the nettle bed there was a trampled down area that looked as if something of significant size had been bedded down there. There was an unmistakable odor of cat and suddenly the nettle patch seemed much less benign. As I cut nettles, Christopher surveyed the trees towering over us for a large kitty. I doubt there was a cougar anywhere near, but once our minds imagined there might be, the activity became extreme foraging.

I decided to make a pure nettle ferment and a kimchi-style ferment (and a nettle kraut just in case).  We were pleased with the results of both new ferments.


Nettle Kimchi

Yield: About 1 pint

Nettle kimchi is delicious in the magic pungency that is created by the combination of garlic, ginger and chiles, and yet the nettles hold their own. This recipe requires a little advanced thinking as the nettles are soaked overnight. Nettles grow in the early spring. If you are gardener and have a patch of garlic greens add them to the mixture. And remember to use your glove working with the nettles; they still can sting after sitting at room temperature in salt water for 10 hours.


About ½ pound of nettles, the first 2 – 3 rows of leaves still attached to stems

Soaking brine 
½ cup salt
2 quarts unchlorinated water

Kimchi mixture
 4 green onions, sliced crosswise in ½ inch pieces
1 tablespoon fresh ginger, ground or minced
3–4 cloves garlic
1–2 tablespoons chile flakes or gochugaru powder 
    Note: As always, adjust the spiciness to your palate. Also the gochugaru is not as hot at the chile flakes and may require more for desired heat.

In a crock or a large bowl, combine the brine ingredients and stir to dissolve. Rinse the nettles in cold water then immerse in the brine solution. Use a plate as a weight to keep the veggies submerged. Set aside, at room temperature for 6–8 hours. 


Using a colander set over a large bowl, drain the nettles reserving the liquid. Combine the ingredients of the kimchi mixture, blending thoroughly. Set aside. The nettles will clump together. Take this whole clump and roll it up to cut crosswise into 1 – 2 inch pieces and put it in a large bowl. Massage in the kimchi mixture.

Follow the instructions for the type of fermentation vessel you are using. If using the simple jar method select a mason jar with a tight fitting lid that is sized appropriately to the amount of mash. Place the mash inside the jar leaving about an inch of airspace. Add reserved brine as needed to make sure the ferment is juicy and veggies stay submerged. Tighten lid. Set aside, somewhere nearby and out of direct sunlight, in cool spot, for 10 – 14 days. 

Check daily to make sure there aren’t CO2 bubbles developing and that the vegetables are submerged; simply press down as needed. If using a plain jar, burp once a day or more often if you see pressure under the lid. Using a utensil, test the kimchi on day 10. You will know it is ready when the flavors have mingled and the pungency is pleasantly fused with acidic tones. The red color will have gotten deeper while the green of the nettle leaf turns a translucent brown khaki green color.

You can let this sit another week in the refrigerator with the lid on to allow the flavors to continue to develop.  This will store in the refrigerator for 8 – 12 months.

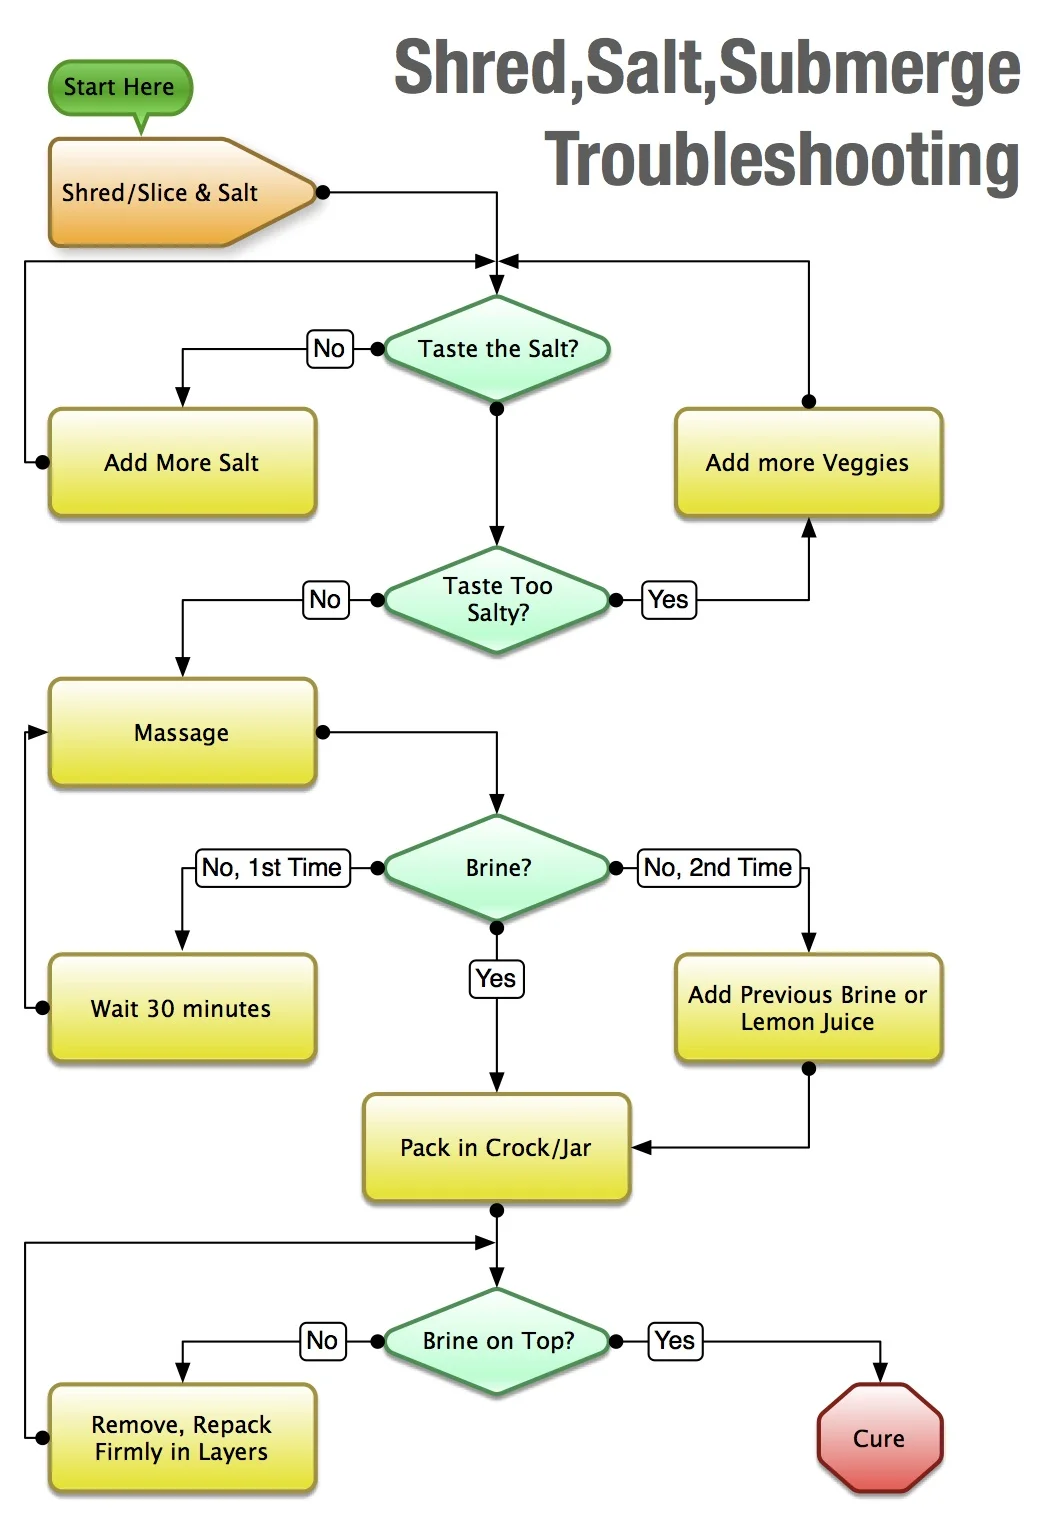
When your cabbage is dry? Sauerkraut brining flowchart

We believe the best sauerkraut (cabbage or other vegetables) comes from dry brining. What does that mean? Fair question since the whole point is to make brine in which to submerge the fermenting vegetables. Dry brining simply means creating the brine in fermentation by only adding salt and allowing the vegetable’s natural juices to create the important liquid. No water is added.

This usually works. Once in a while, you are faced with dry cabbages (maybe they were in cold storage too long) and it doesn't work. Oh, what to do? We have created this handy flow chart to help you when you are feeling there is just not enough brine to properly ferment your creation.

If you would like more help check out our simple course on making sauerkraut and pickles, safely and simply. Got your basic game down already? Maybe it’s time to progress to mastering the process.

Handy flowchart to help you make a delicious brine for your sauerkraut (and other fermented vegetables).

Handy flowchart to help you make a delicious brine for your sauerkraut (and other fermented vegetables).

Let’s walk through this flowchart, adding some hints along the way.

Start by shredding or slicing your cabbage, then adding the salt, but here is a hint. If all of your cabbage is in the bowl and you salt it and its too salty the flowchart says to add more vegetables. If you only want a cabbage kraut and aren’t interested in dropping in some carrots, onions or the like then don’t add all the salt you intend, then taste. If you don’t taste the salt you can continue adding but if you do you saved yourself heading out to the store for another cabbage before continuing.

How long to massage. In out experience the one getting the massage wants it to last longer than the one giving the massage but that might just be us. For the cabbage a perfect massage is until it starts giving up its water that just before had been locked up in its cabbage cells. Your shredding opened a lot of those up, your massaging continues the trick.

Sometimes there is a delay so that’s why the 30 minute rest break. If you still don’t see enough brine then its time to add some good brine or lemon juice. Why lemon juice? We want the acidity. That’s why we never just add some tap water, never.

Finally you pack your lovely creation away in a jar or crock and wait. When you pack one trick is to do it in layers, rather than just dumping it all in at once. Spoon in a layer, squish down, then repeat as you fill the container. You have a couple of options at this point before setting it on your counter and waiting for yumm.

Micro-fermenting :: Small Batch Vegetable Fermentation

Small batch vegetable fermenting followers. Note the veggies are submerged! Photo by Josh Ratza.

Small batch vegetable fermenting followers. Note the veggies are submerged! Photo by Josh Ratza.

Our collective stereotype for sauerkraut production comes from a different time and place—giant wood barrels or huge heavy crocks lining the edge of root cellars, that sour-krauty, pickled fragrance permeating the cool dark air. This mental image of what it means to make sauerkraut, while romantic in its self-sufficient, simpler time, homsestead-y way, is not how most home ferments are made. Most people do not want a committed relationship with five gallons of “sauering” cabbage.

It doesn’t have to be like this. Whatever the reason—a small kitchen, a small refrigerator, single or the single fermentation fan in the family, or simply the fun of experimentation and the desire to have a rotating variety of fermented salads in the refrigerator—small is beautiful.

And small requires certain considerations. Let’s start with the large crock of vegetables tucked away to ferment for three weeks—there is mass. This mass of the cabbage bulk helps keeps the weighted ferment under the brine. 

This isn’t how it is for small and tiny batches. They will need more baby-sitting. However, with a few management strategies your pint-sized ferment will work, it will be fairly easy and it will turnout delicious.

Keeping track of your brine

Because your ferment is small, it stands to reason you have less brine—remember this salty liquid is your kraut’s anaerobic armor. And keeping this brine in the ferment where it belongs will require a bit more attention while your ferment is curing. Often you will find yourself needing to press gently on your weight everyday. This will release the carbon dioxide bubbles that build up and bring the brine back into the ferment.

Submerging in brine: Conquers Evil Every time! This simple chant is all you need to remember to keep your vegetable ferments safe to eat. The rules for sauerkraut, kimchi and pickles apply to pastes, relishes, and other fermented condiments. To avoid a “krautastrophe” keep those veggies under the brine. Some of these condiments, like herbal ferments, have much less brine, but there is still enough. Other condiments like salsas or pepper pastes have so much brine that it is hard to keep the veggies from floating to the surface. In either case it is just a matter of managing the brine. 

The other challenge is simply weighing down the ferment. Small ferments require small vessels and usually this means the time honored mason jar. (We won’t talk about how many of these jars we own.) So you have salted and pressed your veggies tightly in the jar and you have left about 2 inches of headspace for the brine to expand (but not pour out) as fermentation happens. Now it is time to make sure they stay that way.  There are many strategies and many creative folks that have made air-lock lids for jars. 

The water-filled ziplock bag is a common method (explained in this previous recipe post) but about a year ago I discovered an alternative to plastic. Stoneware followers made for jars—whole (pictured for wide mouth jars) or split “stones" (for regular mouth jars). Josh Ratza has brought function and art together with the followers he designed for mason jars. Another potter with a unique weighting system is Mikael Kirkman.

Downsizing your recipes

We have found that to keep enough space for the follower, weight and brine it is best not to fill the jar to the shoulder. These weights are a guide to downsizing your ferment recipes and will keep your ferment in a good place. (Josh also includes a few small-size recipes if you buy his followers.) The salt quantities are 1.5 % of veggie weight, some people like a little more. A good rule of thumb is to taste it. You should be able to taste the salt. It should be pleasant and salty, but not briny like the ocean.

For a pint jar :: Use 3/4  pound of vegetables and 5 grams (or ½ teaspoon) salt.

For a quart jar :: Use 1  1/2pounds of vegetables and 10 grams (or 1 teaspoon) salt.


Hybrid Salsa :: Fermented and Canned

Home canned salsa has been a staple in our home for over twenty years. We usually make at least four dozen jars to last the year. We have used the same salsa recipe for as long as I can remember. Even though it is part of the fabric of our summer canning routine, our only copy is still a hastily handwritten recipe on the back of a scrap piece of paper. The paper is ragged and dotted with spills that span the seasons.

We have made several attempts at a fully fermented salsa, but those sweet sugary tomatoes just don't hold up for very long. To me, this fresh salsa ends up tasting like Pico de Gallo that got too old. We have continued to can salsa. (Interestingly, fermented tomatillo salsa preserves well and the flavors hold for over a year, but that is another blog post.)

We love this canned salsa recipe but have always wished it were thicker. Because of the lemon juice required for the low-acid vegetables, it has always been a bit watery. Last summer, as I made the first batch, I began to think about the lemon juice. Lemon juice provides the acidity to preserve the onions, peppers, and garlic, and insures that the tomatoes are acidic enough. I began to wonder—if I fermented the low-acid ingredients first, could I avoid the extra lemon juice? The two cups are a significant amount. I decided that next time I would try that. I checked the pH level of the “approved” recipe and put that aside. In a few weeks it was time to make another batch of salsa, so Christopher and I prepared everything but the tomatoes. We put this in a crock and fermented it for a week. When this pepper-onion mixture was ready, we prepared the salsa as usual. We tasted it and the flavors were balanced; the lemon flavor was not noticeably missing. Before jarring it, I checked the pH level and it came out the same as the original recipe, but the salsa was not the same. It was nice and thick.

This recipe makes 18 - 20 pints of canned salsa. These are processed in a water bath canner.  We are assuming, if you are interested in this recipe, that you have some experience in home canning techniques. If not check here. See the ferment and pickle pages at you can also download a PDF of the USDAs Complete Guide to Home Canning.

This recipe takes place in two sessions about a week apart. You will not need the tomatoes until after the rest of the ingredients have fermented.

7 quarts chopped tomatoes

4 cups chopped green chilies

5 cups onions, diced

½ cup jalapeños, diced

10 cloves garlic, grated

2½ tablespoons salt

1 tablespoon ground black pepper

2 tablespoons ground cumin

3 tablespoons oregano

3 tablespoons chopped fresh cilantro

Week one: Prepare all of the vegetables and spices except the tomatoes. Salt and place in a jar or crock to ferment for a week.

Week two: Prepare the tomatoes and place them in a large stainless steel stockpot. Bring this to a boil. Simmer the tomatoes for 10 minutes. Add the fermented veggie mixture and bring back to a boil. Simmer for another 20 minutes. Follow USDA instructions for hot-packing salsa and canning in a water bath.

Ladle into hot sterilized jars. Process the jars in a water bath for 20 minutes.

Lacto-fermented Pickled Grape Leaves

Rolled grape leaves ready to ferment in brine

Here we are on the brink of the big harvest season. Cucumbers, peppers, tomatoes, Oh my. But before you get overwhelmed fermenting garden veggies there is one thing you might want to pickle—grape leaves. In Southern Oregon the grape leaves are perfect for pickling right now. The leaves are large—good for stuffing yet still tender and fresh.

Why ferment grape leaves? I see two good reasons. One is to have a supply for winter dolmas (stuffed grape leaves), the other is to have some grape leaves available for pickling late in the season when the leaves have changed or in early spring. For example grape leaves are great to add to lacto-fermented asparagus.

Here’s why. When you use grape leaves to top crocks of krauts and pickles, they not only help keep everything under the brine: They also release tannins, which help keep the veggies crisp. If you pickle the leaves in early summer, you have them on hand to use for pickles during winter fermentation.

Make sure the grape leaves you pick are organically grown. As with all vegetables, the leaves are full of beneficial bacteria, and you don’t want to be consuming chemical pesticides. The variety of grape doesn’t matter. Whatever you can get your hands on:  leaves from table grapes, Concord grapes, wine grapes.

Lacto-fermented Preserved Grape Leaves

2–3 dozen grape leaves

2–3 cups Basic Brine (½ cup salt to 1 gallon water)

Rinse freshly picked leaves in cool water. Put in a bowl, cover with the brine, and let soak for 1 hour.

To roll into bundles, stack anywhere from 8 leaves to all of them. In other words, one huge roll, is okay just keep stacking. Tightly roll each stack from stem end to the tip. (Think cigars and see photo.)

Pack into a sterile jar, wedging them under the shoulder of the jar or with 4 inches of headspace in a crock. Pour in the brine to cover the grape leaves completely. Reserve any leftover brine in the fridge (It will keep for 1 week; discard thereafter and make a new batch, if needed.)

Loosely cover the jar with the lid.

Set aside the jar or crock on a baking sheet, somewhere nearby and out of direct sunlight, in a cool area.  Ferment for 3 to 4 days.

They're ready when the leaves go from a verdant green to a dark, dull green and the brine is cloudy. The changes are inconsistent.  If you were to look into the fermenting bundles, you’d see that the centers are slower to change. These grape leaves will keep, refrigerated, for 12 months.

Store in the fridge in the same jar, lid tight.


The cool and wild side of fermenting :: Mint

There is a natural spring on our property. It is the center and heart of the property both metaphorical and physically. Christopher shares the day we were introduced to the magic of this spring through the wild peppermint. 

The day we found our farm, I had already given up. We had traveled south on Interstate 5 with our three small children and Kirsten pregnant with our fourth to be greeted by temperatures over 100 degrees and a landscape burnt crisp from the heat and lack of rainfall. Every house or property we had seen that day was either moldy, depressingly run-down, overrun with poison oak or a combination of all three. I wanted to retreat to the Willamette Valley, but Kirsten wanted to look at one more. After driving up Thompson Creek for nearly seven miles we arrived at what would become Mellonia Farm and our home. 

While I hiked the hills with the owner, Ron, to learn the borders of this hillside farm, Kirsten and the kids found refuge at the stream in the shade of a beautifully old and gnarled willow tree. There, the boys stripped to their skivvies and splashed in a stream lined with wild peppermint. Driving home that evening the peppermint from the sleeping children’s legs filled the car, and we knew we had found our new home.

Fast forward fifteen years as summer approaches and Southern Oregon is in a state of drought. The soil has been too dry to dig with a pick ax for at least a month, but the mint along the spring is vibrant, refreshing, and smells of water and relief.  It is time to harvest—some will be dried for tea and some I will preserve through fermentation. Fermented mint? Yup and it is really tasty.

Mint, like its family-member basil, has played a significant role in traditional herbal pharmacopeia throughout history. Its wonderful scent and flavor have also made it a leading player in the kitchen, adding a cool refreshing taste to dishes, as well as ferments. Of the many varieties of mint, spearmint, curly mint, and peppermint (the strongest flavor of the three) are the most common culinary types, but there are also fruity varieties, such as apple, pineapple, or orange mint. The flavor of the various mints holds up well in fermentation. If you are creating your own recipe, use similar quantities to those you would use in a fresh salad or veggie dish. Choose the type of mint that you have available or like best, and add it to the ferment when you combine the rest of your vegetables, just before salting. Chopping the leaves will release a little more flavor in the ferment. 

Fermented condiments tray with Celery-Mint Salad


Celery-Mint Salad

Cool, bright, and lively, this ferment will be a wonderful addition to a summer spread.

1 1⁄2 pounds celery, thinly sliced crosswise (including leaves)

1 bunch scallions, greens included, finely chopped

6 sprigs mint, thinly sliced

1 teaspoon unrefined sea salt


Prepare the vegetables and place in a bowl. Sprinkle in the salt, a little at a time, tasting as you go until it’s slightly salty, but not overwhelming. Massage the mixture and let sit, covered, for 30 minutes.

Pack the mixture, a few handfuls at a time into a 1-quart jar, pressing as you go to remove air pockets and release brine; because of the texture, it will take some effort to get it tightly packed. This pressure will release more brine. When the jar is packed, leave 2 to 3 inches of headspace. With store bought celery there will likely be a noticeable layer of brine, while homegrown may just barely cover the vegetables. Follow with a grape leaf or piece of plastic wrap to keep the veggies submerged under the brine. Because of the low brine content, make sure this is weighted well with either a sealed water-filled jar or a water-filled ziplock bag to act as a combination follower and weight. Set aside to ferment, somewhere nearby and out of direct sunlight, in a cool spot for 5 to 10 days.

Check daily that the celery is submerged, pressing down as needed to bring the brine
back to the surface. When it’s ready, this ferment will be crunchy, will taste of fresh and minty, and will have a mild, light sour flavor, very different from the sour boldness of most krauts.

If it’s sour enough for your palate, tamp down the ferment under the brine, screw on the lid, and store in the refrigerator. Because of its high natural nitrate content, celery keeps well if it remains submerged, and will last over 1 year—but you will want to eat it well before then.


Mustard Greens, Fermented Kimchi, Chicken, and Sesame Seeds :: YUM!

Kimchi Sesame Mustard Green Salad w/ Chicken

Markets are loaded with many varieties of mustard greens—longer days and cooler weather make these brassicas delicious. Sometimes raw mustard greens will mimic that sinus-clearing horseradish (or wasabi) heat which I happen to love but others do not appreciate. This peppery flavor transforms with cooking into bitter bite.

In this quick-to-prepare recipe the peppery-heat of the greens is mellowed as the kimchi sesame dressing wilts the fresh leaves. The flavor is lively with the mingling of the fermented vegetables and the fresh greens.

Mustard Sesame Salad With Kimchi and Chicken

Serves 2 as a meal, 4 as a side salad

1 -2 chicken breasts

granulated garlic powder

a bit of oil for coating the roasting pan


1 bunch curly mustard greens

½ - 1 cup drained kimchi


2 teaspoons naturally fermented soy sauce

1 teaspoon black sesame seeds

1 tablespoon rice vinegar

1 tablespoon toasted sesame oil


Place the oven on the broil setting. Coat the roasting pan with oil.

Cut each chicken breast into about 3 equal-sized pieces for quick and thorough roasting. Place these on greased pan. Sprinkle on the granulated garlic powder. Place on a middle rack in the oven and broil for about 10 – 15 minutes, or until completely cooked.

Meanwhile prepare the dressing and the salad. Rinse off the mustard leaves and crosscut for a bite-sized piece. Set aside. Measure and drain the kimchi. (Remember always keep or drink your brine!) Rough chop the kimchi until it has a finer consistency.

Place the dressing ingredients in the salad bowl. Add the chopped kimchi. When the chicken is ready remove it from the oven and slice into bite sized pieces. Place these in the bowl with the dressing to soak up the flavors. Add the chopped mustard greens, toss and serve.


Technicolor Pickled Eggs

Ruby eggs in a beet kraut nest

The classic Wizard of Oz movie begins with Dorothy in dusty grey Kansas, and the film turns Technicolor brilliant when she and Toto land in Oz. Okay, so by today’s standards that is not a very impressive movie trick, but in 1939 it was pretty spectacular. In 1939 maybe Technicolor was new but zippy kraut flavor was not. In those days the average citizen likely still knew what fresh sauerkraut tasted like. Here and now fermented vegetables are arriving with the same flamboyance as Dorothy did in Oz .

Fresh fermented sauerkraut compared to the mushy tart canned stuff is a similar experience for us post-post modern citizens. This “classic” taste that for many years has been relegated to the hot dog experience is being reborn in dazzling hues with sparkling flavor. Who knows—in 75 years people might look back and think hmmm what is the big deal?  Haven’t fermented veggies always been this diverse and incredible?

So we thought for Spring fun, why not add wonderful flavor and some vivid color (plus a little probiotic goodness) to hardboiled eggs for any brunch menu.

Hard boil some eggs, about 2 to 3 eggs per color.  When the eggs are cool, peel. You will gently nest the whole eggs into about two cups of a vegetable ferment. This is where it gets fun. Choose a colorful kraut. Here are a few Wizard of Oz inspired ideas.

Yellow Brick Road :: For eggs with a golden hue, choose a kraut made with turmeric or golden beets

Ruby Slippers :: For stunning fuchsia eggs, submerge the eggs in a beet kraut, or kraut made with red cabbage. (For a recipe and more about beet kraut see the BREATHE issue of Taproot Magazine.)

The Field of Magical Poppies :: Choose a spicy kimchi for orangey-red eggs

The Emerald City :: Okay, emerald-colored eggs is a stretch. You need a kraut with plenty of chlorophyll, but the green veggies don’t really impart their color into the brine in a way that is needed for coloring. The best we could do was a light green, which we made with an all-leek ferment. And plain cabbage kraut does not impart amazing color but does make for some tasty pickled eggs.


Once you have a kraut or two selected to jazz up your eggs gently tucked the eggs in the kraut bed, place in a jar or suitable covered container, making sure that the eggs are all topped with the kraut. Allow to marinate in the refrigerator for 2–4 days.

We had fun with this—we hope you do too!


First Signs of Spring :: Fermenting Dandelion Buds

dandelion bud on a frosty morning

dandelion bud on a frosty morning

Kirsten writes :: Here in Southern Oregon the first dandelions have begun to bloom. Christopher and I had very different early relationships with spring dandelions. His father saw their appearance as time to tame the lawn while my mother saw them as a bounty to harvest.

Our first house as a young couple was a little saltbox in Boise with a backyard that the previous owners had planned to pave for a big shop. Thankfully they didn’t get that far.

The first spring there we picked and shoveled our way to the soil. The yard responded to the change in stewardship by celebrating with a riot of dandelions, which I proclaimed to be our first crop. When I was young, we lived in married student housing on the Cornell campus. There were vast lawns out the back door polka dotted with yellow dandelions. In the early spring my mother would pick the flower buds and sauté them in plenty of butter and garlic. When the flowers bloomed she made fritters. I don’t remember the flavor. I do remember the magic of eating off the lawn. Naturally I wanted to share this joy with our son.

Christopher writes :: I was skeptical but when I heard this project involved batter and frying I was game. We had just settled into a mound of fried dandelion blossoms out on the back patio when we heard the old wooden gate complaining and in came my father. By then I had downed a few of the golden beauties and I was eager to share my revelation with the man that had spent my childhood spraying, forking and mowing these delicious plants.

“Hey Pop, try these–they’re great!” I said, standing up and holding out my plate to him.

“What are they, morels?” he asked hopefully, reaching for a crispy blossom.

“No they’re dandelions!” I proudly announced.

My father’s hand stopped mid-air as he scanned my plate. I watched as he slowly looked past me. Turning, I saw our son in his cloth diaper sprawled out on the cool concrete of the patio, digging into his portion.

“Are you are feeding the baby weeds?” he asked us, clearly not wanting to believe his eyes.

By the time we thought of foraging dandelions to ferment, our toddler had three younger siblings and had entered college. There were many trials that included everything but the fluff—bud, leaf, and root. While we acknowledge the incredible health benefits of fermenting the greens we just don’t love (or even like) the bitter flavor, which isn’t mitigated at all by fermentation. (The best way to use the leaves is as small part of a batch of cabbage sauerkraut or spicy kimchi.) It is once again the blossom buds that have us eating from the yard.

 Dandelion buds in brine ready to start fermenting


Dandelion buds in brine ready to start fermenting

Fermented Dandelion Flower Buds

Make in a pint jar

When selecting flower buds to pickle, be sure to pick buds that are still tightly closed, not flowers that have simply closed for the night, which will have bits of petals sticking out. Use these small pickles as you would capers.

2 cups dandelion buds

1–2 heads garlic, broken apart and peeled

1 onion, sliced in wedges

1 (1–inch) piece fresh ginger, chopped

2 tablespoons red goji berries

1 cup Basic Brine (1/2 tablespoon unrefined sea salt to 1 cup unchlorinated water)

Combine the dandelion buds, garlic, onion wedges, ginger, and goji berries in a bowl. Transfer to a quart jar and pour in the brine to cover the mixture completely. The dandelion buds will want to float; place some of the larger onion wedges on top to keep everything under the brine. Reserve any leftover brine in the fridge to top off while fermenting. (It will keep for 1 week; discard thereafter and make a new batch, if needed.)

Follow with your favorite follower and weight, or use a water-filled ziplock bag. This steep is important to prevent the small ingredients from floating out of the brine. Remember: Submerge in brine, and all will be fine.

Set aside on a plate to ferment, somewhere nearby and out of direct sunlight, in a cool spot for 5 to 7 days. During the fermentation period, monitor brine level and press buds back into brine or top off with the reserved brine solution, as needed. You may see foam on top; it is harmless. As the vegetables ferment, they begin to lose their vibrant color and the brine will get cloudy; this is when you can start to test your pickles. They’re ready when: The buds are dull green, the goji berries are plump but still bright orange red and the brine is cloudy. The flavor of the buds and the brine are slightly sour, with ginger and garlic notes, 

Store in the fridge in the same jar, lid tight. These will keep for about a year. Enjoy them sprinkled on salads, added to a sandwich spread such as chicken salad, or simple pluck out of the jar for a little pickle-y treat.

Burdock Carrot Kimchi

In the past (before grocery stores and global shipping) February was a hungry month. It was a time when the winter stores were thin and the fresh tender greens were only beginning to poke through the earth. Many cultures relied on their fermented stores to provide them with fresh crunchy tastes and vitamins. 

Our winter eating challenge is a little different now. Our dilemma is knowing what to choose from the cornucopia we have available to us. (Fresh raspberries in winter—how far did they travel?) Seasonal eating in the temperate climate, at the latitude where you live, can leave you looking at a lot of root vegetables in February. One of these roots is the homely burdock, or gobo (its Japanese name), which looks like a dirty stick next to the bright carrots and crimson beets. Go ahead, look twice at this root. It is healthy and makes a delicious ferment. You’ll find it in the vegetable section of natural-foods stores. Look for roots that are still firm, not limp like an old carrot. Select those that are about the thickness of your thumb; any bigger than that and they tend to be woody. 

The reputation of burdock, or, as it’s called by its botanical name, Arctium lappa, bounces between nuisance weed to flower gardeners and essential to herbalists and chefs. 

Burdock has anti-inflammatory, antioxidant, and antibacterial properties. It’s said to aid digestion and alleviate arthritis and some skin disorders. This list goes on, and the reason is that this “weed “belongs to the class of herbs known as adaptogens, which work to balance the system. This group of high nutritive and medicinal broad-spectrum plants includes perilla, spikenard, nettle, and ginseng.

As a biennial in its second year of growth, it can be seven feet tall, its many branches sporting mature seed heads that reach out and command attention by sticking to the passerby—hence the nuisance weed reputation. You can hardly read anything about burdock without the anecdotal tale of its role in the invention of Velcro. 

1948. Switzerland. Walking dog. Burs stick to dog. Mind wonders. Microscope reveals hooks. Violà. George de Mestral invents Velcro. Not to be left out, it has been included here—along with a recipe for Burdock Carrot Kimchi:

Violà. Burdock-Carrot Kimchi

Burdock oxidizes to an unappetizing gray-brown when shredded and exposed to the air. Although in the beginning, the color makes you think the burdock must have been scraped off the forest floor, after some hours in the anaerobic, soon-to-be-acidic environment of the brine, the brighter color of the freshly shredded root returns. 

We find this condiment to be a perfect and tasty way to incorporate burdock into our diet. It’s a satisfying snack in the middle of the afternoon — a dollop of Burdock-Carrot Kimchi and a few slices of raw cheese.

Makes about 2 quarts 

We like our kimchi spicy, but we leave just how hot up to you. 

2 pounds burdock root, peeled and thinly sliced crosswise

2 pounds carrots, thinly sliced crosswise

1 bunch scallions, greens included, cut into 1-inch slices 

3 cloves garlic, minced

1 tablespoon finely grated fresh ginger

Zest and juice of 1 lemon

Crushed red pepper flakes, or unsalted gochugaru , to taste (use a pinch for a mild flavor to 1 tablespoon for fiery-hot)

1– 1 1/2 tablespoons unrefined sea salt or  1/2 cup fish sauce

Combine carrots, scallions, garlic, and ginger in a large bowl. Mix well and set aside.

Peel the burdock root and thinly slice crosswise; then quickly squeeze on the juice of the lemon, to help the root retain its color. Add the burdock, lemon zest, and pepper to the bowl, mixing to combine.

Sprinkle in 1 tablespoon of the salt or fish sauce, working it in with your hands; if you are not getting much brine, let sit, covered, for 30 to 45 minutes. Taste for salt. It should have a slightly salty flavor but not an overwhelming saltiness. Add more salt if needed. Then toss and massage again for a few minutes to get everything mixed. At this point you should see brine at the bottom of the bowl. Transfer your vegetables into a jar or crock, a few handfuls at a time, pressing to remove air pockets. More brine will release, and you should see brine above the veggies.

Top the ferment with a 1-quart Ziplock bag. Press the bag down onto the top of the ferment, fill it with water, and seal. Set aside on a baking sheet to ferment, somewhere nearby and out of direct sunlight, in a cool spot for 7-14 days. 

Check daily that the vegetables are submerged, (remember the veggies need to be anaerobic) and scoop out any scumthat develops. Using a utensil, you can start to test the ferment after one week. You’ll know it’s ready when it’s pleasingly sour, the flavors have mingled, and the pungency of the kimchi spices have developed. Tighten the lids and store in the fridge. This ferment will keep, refrigerated, for one year.

Pickle Babies :: Fermenting the season's end

Baby Pickles - From garden to brine, pre-fermentation

In the Siskiyou Mountains of Southern Oregon, the weather and I are dancing—two-stepping in and around the autumnal edge of the garden—the killing frost. A cloudy day means I can push cleaning out the garden one more night and one more day of ripening fruit. A clear sky in evening after a glorious fall day often means that frost will skitter across the landscape. Some mornings before sunrise I stand with the brittle chilled hose spraying ice-cold water on plants to abate the coming damage. Because of the terrain and waterways it has frosted a few times in the last week but not landed in the garden. Beyond a few cold singed high flung top leaves of the squash plants, the hard frost has not landed as a death blanket across the tender annuals. I still had time.

It is of course double edged like most things in life—oh please frost take out the endless stream of work, picking and preserving—but it is also the end of homegrown warm season bounty. Often, even the years when I don’t think I can possibly pluck another morsel, lift another crock or empty a steaming hot canner, the threat of frost spurs me on. I can’t see food go to waste. I drag flat boxes, buckets and baskets to fill as every last green tomato, pepper and basil leaf gets harvested.

This year the cooler, damper temperatures brought with them a flush of garden activity. Squash and cucumber plants hardly productive in August sprouted new flowers and fruit in one last effort to fulfill their task of birthing seed. These pinky thick zucchini, the quarter-sized patty pans, lemon cucumbers, the dimensions of maybe a walnut, will never reach maturity. But they are abundant, can be eaten at any stage and make wonderful bite sized pickles. 

Fermentation happens - three days in brine, notice CO2 bubbles in dill seed head

Fermentation happens - three days in brine, notice CO2 bubbles in dill seed head


End of the garden medley (where bite-sized veggies shine)

Makes one gallon

a few pounds of mixed (any combination) immature squash and cucumbers, enough to fill a gallon jar to the shoulder,
10 or more whole garlic cloves, peeled
2 tablespoons pickling spice or:
1½ teaspoons mustard seeds
1½ teaspoons whole black peppercorns
1 teaspoon coriander seed
1 teaspoon dill seed, or better a couple of fresh dill seed heads
2 bay leaves
3—4 whole hot dried red pepper such as cayenne


Prepare Brine:

3/4 cup unrefined salt

1 gallon water

optional: grape, oak, or horseradish leaves to top ferment, the tannins will help keep things crunchy


If the squash still have their blossoms, you can pickle them as well. Take care that they are still whole and not wilted. Rinse off any dirt.

You don’t want any part of the blossom if using cucumbers. Scrub them in water; take care to trim the stem and make sure the blossom end is clean as it contains an enzyme that will soften your pickle. Crush the garlic cloves slightly with the back of knife, just enough to break them.

Pack veggies into a few wide mouth jars, or a 1-gallon jar. (If using a crock, you will pack into jars later.) Mixing in garlic and all other ingredients as you go, distributing equally.
Pour the salt brine over the cucumbers. It must cover all of the vegetables.

If you do have a grape leaf or other tannin leaf, this would be the time to add it.


Place a smaller jar filled and sealed with water on top for weight. If your little future pickles are packed and wedged tightly you will not need to place a weight on top. Just cover the jar, but do not tighten lid—it needs to breathe out the CO2. If you are fermenting in a jar you can watch the process. At this point the vegetables will be an incredibly vibrant. It will look as if all the colors are magnified. As they start to ferment you will see the colors turn drab. This change is a result of the acids interacting with the chlorophyll. The brine will get cloudy–this is a normal part of the lactic acid production. If you are fermenting in a crock, no worries all this will be happening as well.

After four days of fermentation time on your counter you will have half-sours in a about six days the flavors will all be stronger and more sour.

Enjoy!


Rhubarb Fool(s)

Rhubarb fermented with ginger and cardamom

A few days ago I was having tea with my dear friend Vicki, and she was telling me about a meal she cooked recently for her family. That is what we foodies do—talk about food. Sometimes it is recent meals, sometimes the amazing vegetables growing in our garden and how we will prepare them. Yes, I admit that it's strange, sitting around talking about good food while sipping tea and secretly competing to see who can make the other more hungry.

“...and I made a rhubarb fool for desert.”

“Whoa, hold on, what pray tell is a rhubarb fool?” I interrupted.

“You have never heard of a rhubarb fool? It is a simple old style desert. I think it is from England. You take rhubarb that has only been slightly cooked, just simmered soft, but not so soft that it falls apart. When that has cooled you fold it into whipped cream.”

I confess that whipped cream might just be one of my favorite pleasures, next to butter. (hmmm a theme...is this the place to admit that buying our first dairy cow was all about the cream. We shamelessly named her ‘Buttercup’.)

Christopher happened to be out of town this week, not that he wouldn’t support what happened that night at dinner, but it makes a better story. I came home with visions of fool and told the kids all about it and made the executive decision we would eat a few leftovers before having the rhubarb fool for dinner.

As I was dashing down the hill, paring knife in hand, to our massive rhubarb plant, Dmitri said. “Don’t you dare ferment it.”

“Oh I won’t I assured him.” I knew I wouldn’t tonight, but I would bring some extra stalks with me and see what would happen. I had fermented rhubarb before but this time I was looking for a different flavor.

The ferment-free fool was amazing and our fool bellies were so full it was embarrassing, especially when Christopher called.

Here is a recipe for the rhubarb that I fermented.

Fermented Rhubarb infused with Ginger and Cardamom

1 pound (about 3 1/2 cups) rhubarb stalks, sliced
1 scant teaspoon pink salt, Himalayan or Redmond Real Salt from Utah, these salts have a higher mineral content and are sweeter
1 tablespoon grated fresh ginger
1/4 – 1/2 teaspoon ground cardamom

Placed sliced rhubarb, salt, ginger, and cardamom in a bowl. Massage all the ingredients together. When the salt has coated all the rhubarb and it is starting to weep, cover with a towel. Allow to sit for a half hour then press into a quart jar.

When the brine is above the rhubarb weight it down and allow to ferment on your counter for four to five days.

This on on its own makes a tasty condiment. However I was determined to make a 'fooled-you' rhubarb fool.

"Fooled-you" Lacto-fermented Rhubarb Fool

Epilogue

Last night the rhubarb was deliciously fermented, strawberries and cream were purchased. I began to put together my vision of a fermented rhubarb fool. My children begged me not to mess with the known dessert–in the spirit if it ain't broke don't fix it.  

"At least try it in a small amount first." 

"That's not how I roll." It always throws them off when I use their slang. 

I placed one cup of the above fermented rhubarb in the food processor with two cups of fresh strawberries and 3 tablespoons of sugar. I processed this and grated in the zest of one lemon. I then whipped a pint of heavy cream.

Instead of folding in this strawberry-rhubarb sauce I layered it like a parfait.

It looked great. The same aforementioned children, remembering their full fool bellies, asked if we could eat dessert first. We did while the lasagna waited.

Two interesting things happened.

The kids loved it and apologized for doubting me. The other thing is our bellies were happier. The fermented rhubarb was lighter on our digestion. We all enjoyed our lasagna and there was no groaning with tight bellies when we left the table.


Spring Cleaning

Sauerkraut Frittata ​garnished with chives and dandelion petals

     Every fermentista I know has a batch of kraut that languishes in the back of the refrigerator—the place where the orange marmalade jar (a gift from Aunt Zelda who visited Great Britain a few years ago), prickly pear pickles (she went to Arizona last year), and the unloved krauts reside. Sometimes the rotation in the back of the fridge is longer than anyone of us would care to admit and we don’t have to.

     So this kraut, stepchild that it is, is technically good—as in, it isn’t rotten.  It tastes fine, creamy even—as in too soft.

     We could go into the why is my kraut soft? But this post isn’t about the why. It is about solving the dilemma of a kraut that you don’t want to throw out and don’t want to eat. This is normal. Many of us get very attached to our batches of live food and we feel terrible, like we have let them down, by sending them into the compost pile.

     There is help. It is Springtime, time to purge the old krauts to make way for all the delicious fermentation that you will be doing with the spring vegetables that are bursting forth from the waking ground. While I have no tricks for the marmalade or cactus pickles, I can share some ideas for the soft kraut.

     Use soft textured krauts in dishes where a soft texture is appropriate and pleasing to the palate.  A scoop of the kraut cooked in a stew is one example.  Because eggs are also so abundant this time of year one idea is a frittata. (Should I admit there are 16 dozen duck and chicken eggs in our refrigerator as I write this?)

     A frittata is essentially a flat omelet that has the stuffing baked into it. It has the flamboyance of a quiche without the work or the gluten of the crust.

     The beauty of this recipe is that it can be varied easily just by changing the type of kraut. And it is important to say—this is delicious with perfectly crisp kraut as well. Please feel free to play with this recipe; change up the kraut flavors or the herbs.  For a richer dish, add smoked salmon or Italian sausage.

Sauerkraut Frittata

1 ½ cups raw sauerkraut, drained

2 tablespoons olive oil

1 medium onion, thinly sliced

6 eggs

pinch of salt and pepper

a scant ¼ teaspoon freshly grated nutmeg

3 cloves of garlic, minced

2 tablespoons butter

optional: 2 tablespoons parmesan cheese

     Preheat oven to 350ºF.

     Sauté the onion in 1 tablespoon of the olive oil until caramelized, set aside.


     Crack the eggs into a large mixing bowl.  Add salt and pepper, nutmeg, the second tablespoon of oil and the garlic. Beat lightly.


     Gently squeeze the kraut to remove most, but not all, of the liquid. Stir the kraut and the cooled caramelized onions into the egg mixture. This is also the point to add the optional salmon or sausage.


     Preheat a well-oiled 10-inch heavy skillet on medium-low heat.  Melt the butter in the skillet and pour in the egg-kraut mixture.  This will set the bottom nicely. Immediately transfer to the preheated oven.


     Bake 20 - 25 minutes or until set.


     Remove from oven and sprinkle optional parmesan on top.


Spring Tonic—Radish Fennel Ferment

Radish Fennel Ferment


     I wanted to come up with a recipe that welcomed Spring.  I desired a flavor that was cool and crisp just like the season. I fancied a ferment that was light—both in taste and in color. I imagined a pastel-colored ferment to compliment the light pink and white blossoms of early spring.


     I wanted to use radishes for two reasons. The first is that red radishes are quick growing in cool temperatures. They are one earliest available local vegetables in a temperate climate. The second is that radishes are a food we should be eating to help our bodies come out of winter. In Traditional Chinese Medicine radishes are a wonderful tonic for the liver and gall bladder. Radishes break up fat and phlegm, and regulate bile flow—in a sense consuming radishes get your juices going.


     I decided to keep this ferment unpretentious. I chose fresh fennel to combine with the radish. I thought the light aromatic flavor would compliment the more watery, spicy radish. Nutritionally, I also knew that fennel is great for digestion. Fennel is also rich in vitamin K2 which works in the circulation system by breaking up "debris" in blood vessels. Vitamin K2 is also important in your diet if you are taking oral vitamin D. Here is a link for more information on fennel and fermentation.


      This ferment is very simple. You can start it today and in 3 or 4 days you can enjoy it. It is tasty sprinkled on a green salad or alongside protein rich foods such as hard-boiled eggs.


Makes 1 pint

1 bunch small radishes, such as Cherry Belle or French Breakfast

1 medium fresh fennel bulb

1 ½ teaspoons salt


     Remove the stems and wash the radishes. Slice very thin, using the slicing blade on a hand grater or food processor. Place in a bowl. Cut the thick root end off the fennel bulb and also slice it as thinly as possible. Put this in the bowl with the radishes.  Chop any fennel frond and put it into the bowl as well. Save the thick fennel stocks for something else. Add the salt slowly. Massage it in and taste after about half the salt has been added. Keep adding the salt until you just taste it. You should be able to taste the salt, but the salt should not dominate the flavor.


     It will produce enough brine without much time or effort.  Press the mixture in a quart jar. Weight it down, making sure all the vegetables are under the brine. Allow to ripen for 3 – 4 days in a cool out of the way spot on your counter.


Fermenting Sweet Potatoes

Pressing sweet potatoes to create brine for lacto fermentation.

     It was a simple question. My son asked, “Are these sweet potatoes or yams?”

      I confidently answered, “they are sweet potatoes.” My mind however was exhibiting some doubt; I visualized standing in the produce section in front of the sweet potato display—Jewell yams. I had brought home Jewell yams but I also knew I had identified Jewell yams, Garnet yams, Japanese sweet potatoes, and Beauregard, all as sweet potatoes. Was I fermenting yams or sweet potatoes? Uh-Oh, I thought, what is the difference between sweet potatoes and yams? My first pass of “asking google” left me more confused than enlightened.  The important thing I came away with was that sweet potatoes and yams are not related botanically, the nutritional content is very different and that sweet potatoes are soft and sweet while yams are starchy.  I read posts that referred to the yam as white and the high beta-carotene content of the yellow and orange-fleshed sweet potato. This did not map to my experience in the grocery store. The tubers that were labeled as sweet potatoes had white flesh and the tubers labeled as yams had rich orange flesh.

     It was getting late; I am a morning person and I was realizing this was a bigger project. The next morning I went and talked to the produce manager. He told me about the orange-fleshed yams and the white or creamy-colored sweet potatoes.  I realized the confusion was bigger than my own. It was in the markets and marketing. 

     All my supposed “sweet potato” ferments had been with the orange-fleshed “yams” for no other reason than they are my personal favorite and the color is beautiful. I bought 10 pounds of a creamy pale variety of sweet potato thinking I had not even begun to try to ferment sweet potatoes.  I shared my confusion with Christopher; “I bought sweet potatoes for an emergency ferment."

     He said, “I wonder if the phrase ‘I bought sweet potatoes for an emergency ferment’ has ever been uttered in human history.”  I wasn’t sure he got the gravity of the situation.

     I went back to researching the difference, it turns out most tubers in the grocery stores in this country are indeed sweet potatoes even when labeled yams. I had been fermenting sweet potatoes along.  True yams are grown in Africa and in the Caribbean and very few ever end up in our US grocery stores—especially not in rural southern Oregon. If you happen to find a true yam you will not be confused. They are larger, they have rounded ends, their skin is tough—almost bark-like, and the flesh is sticky.

     So why all the confusion?

     I did learn there has been confusion for many years. Here is the beginning of the second chapter of a book written on sweet potatoes in 1896: “Since the little word “Yam” is the cause of great confusion in the nomenclature of sweet potatoes, especially in the Southern States, it may be well to give some space here to the discussion of the vegetable of which the word is more properly the name.  The word Yam…is of African origin and means “to eat” in several dialects…”

     It is believed that when orange-fleshed, softer-textured sweet potatoes were introduced in the southern United States, growers wanted to differentiate them from the more traditional, white-fleshed types.  The African word nyami was used by the slaves to describe the southern sweet potato as it reminded them of the starchy, edible root from lily family of plants that they knew from their homeland. It was adopted as yam for these softer sweet potatoes, which incidentally are in the morning glory family and most likely native to the Americas.

     Now that we know the difference let’s talk about fermenting them.

“Lactic-acid fermentation also has some other distinct advantages, e.g., the food becomes resistant to microbial spoilage and to development of toxins (Kalantzopoulos 1997). Sweet potato, in tropical regions, is consumed in the households of small farmers and poor people. Night blindness is a major physiological disorder among these people due to vitamin A deficiency, which can be alleviated by regular consumption of orange-flesh (b-carotene-rich) sweet potato either fresh, boiled and as lacto-pickles.”–S.H. PANDA, M. PARMANICK and R.C. RAY


     Sweet potatoes are considered the world’s seventh most important food crop. A study was done in India in 2006 to see if lactic acid sweet potato pickle would be viable for small-scale industries. They deemed lactic-acid fermentation as “an important technology” in developing nations. They were interested not only in the nutritional benefits but also the “hygienic” potential because it is a safe way to process food. The study concluded that sweet potatoes could be pickled and that the flavor was pleasing.


     We are going to say the flavor is more than pleasing. It is amazing.


     Use sweet potatoes as you would carrots. They respond and look quite similar in a ferment.

Sweet Potato Ferment

Makes 2 quarts

5 pounds sweet potatoes, peeled and thinly sliced

1 medium onion, diced

1 green bell pepper, diced

5 cloves garlic, finely minced

3–4 dried tomatoes, thinly sliced

1 tablespoon fresh ginger root, grated

1 tablespoons whole coriander seeds

2 teaspoons cayenne powder

1–2 tablespoons salt

In this ferment there is no shredding. Instead we are slicing the sweet potatoes quite fine. This is best done with the slicer side of a grater or the slicing blade in your food processor.

Add the rest of the ingredients, then it is the same—salt and submerge.

Allow to ferment for about 2 weeks.

Learn more about fermenting any vegetable on our self-paced online fermentation masterclasses at Fermentation School.